
Raspberry Pi Ultrasonic Sensor Interface Tutorial
Introduction
In this article, we will explore how to interface an ultrasonic sensor with Raspberry Pi. This tutorial is designed to help beginners understand the working principle of ultrasonic sensors and how to integrate them with Raspberry Pi for distance measurement applications.
Understanding Ultrasonic Sensors
Ultrasonic sensors are widely used for distance measurement in obstacle detection systems, automation, and DIY radar projects. These sensors operate on the principle of sound wave reflection, similar to radar. They emit high-frequency sound waves and measure the time taken for the waves to bounce back after hitting an object. Using this information, the distance can be calculated using the formula:
Distance = Time x Speed of Sound
Where:
- Time refers to the duration taken for the sound waves to travel to the object and back.
- Speed of Sound varies based on environmental conditions like temperature and humidity.
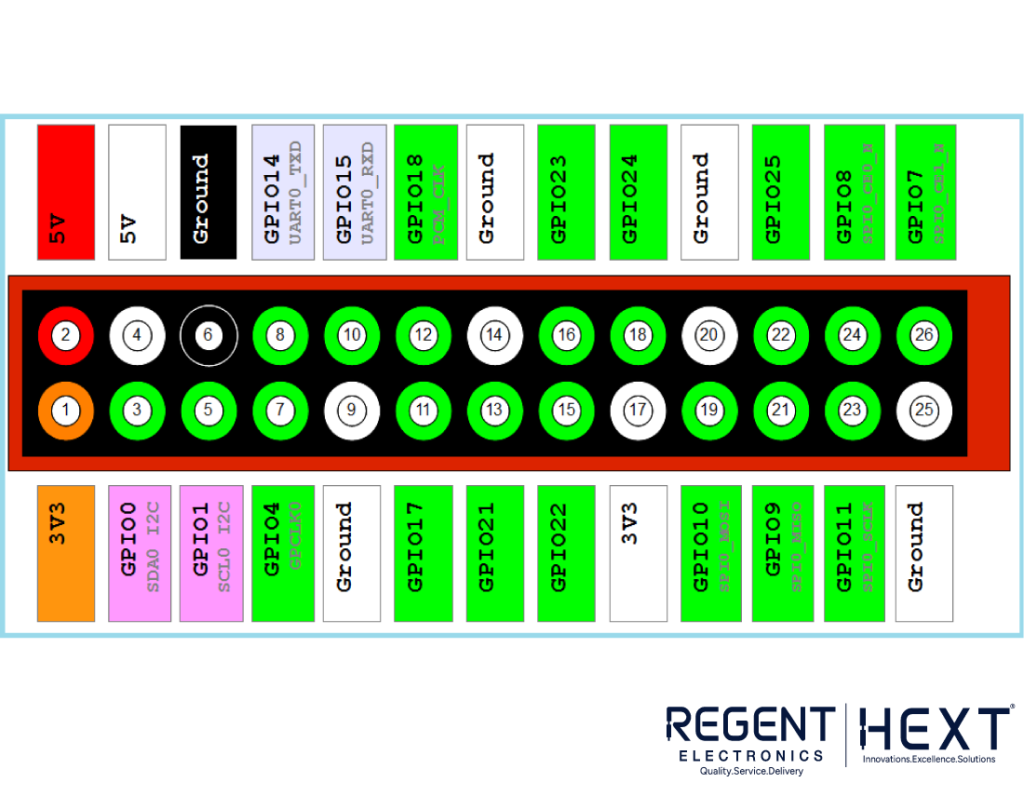
Interfacing Ultrasonic Sensor with Raspberry Pi GPIO
An ultrasonic sensor consists of four pins:
- VCC (Power Supply)
- GND (Ground)
- Trigger (TRIG) (To transmit ultrasonic waves)
- Echo (ECHO) (To receive reflected waves)
Required Components
- Raspberry Pi 4
- Ultrasonic Sensor (HC-SR04)
- Voltage Level Converter
- 5V 3A Power Adapter
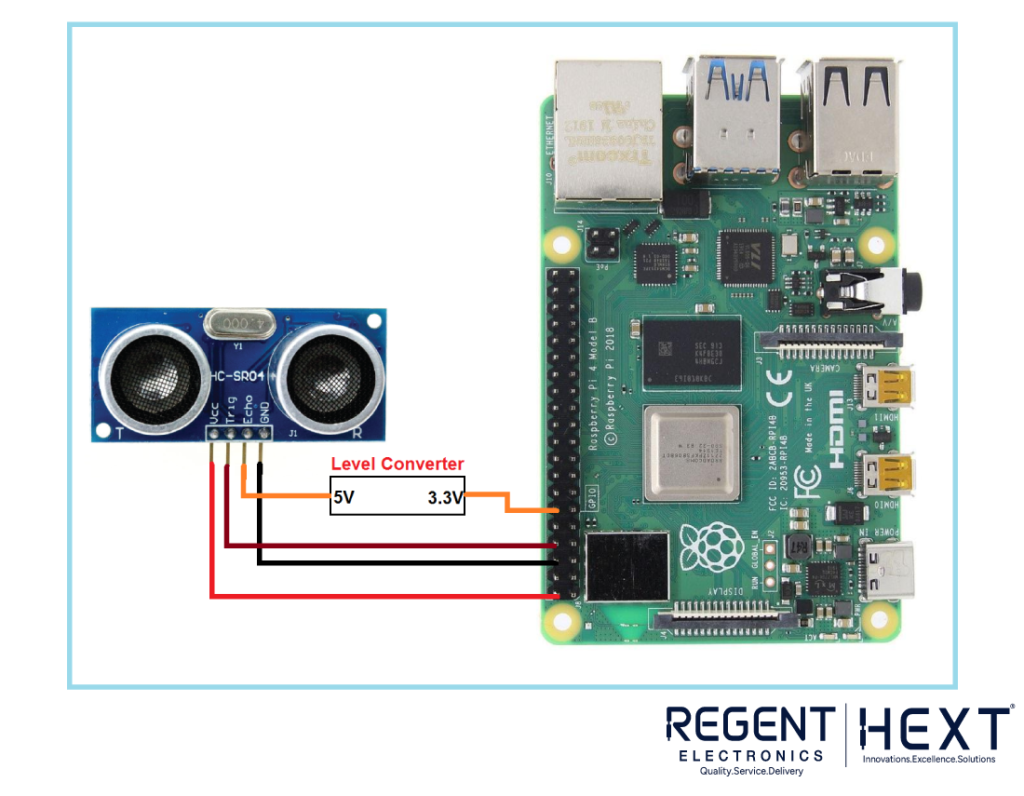
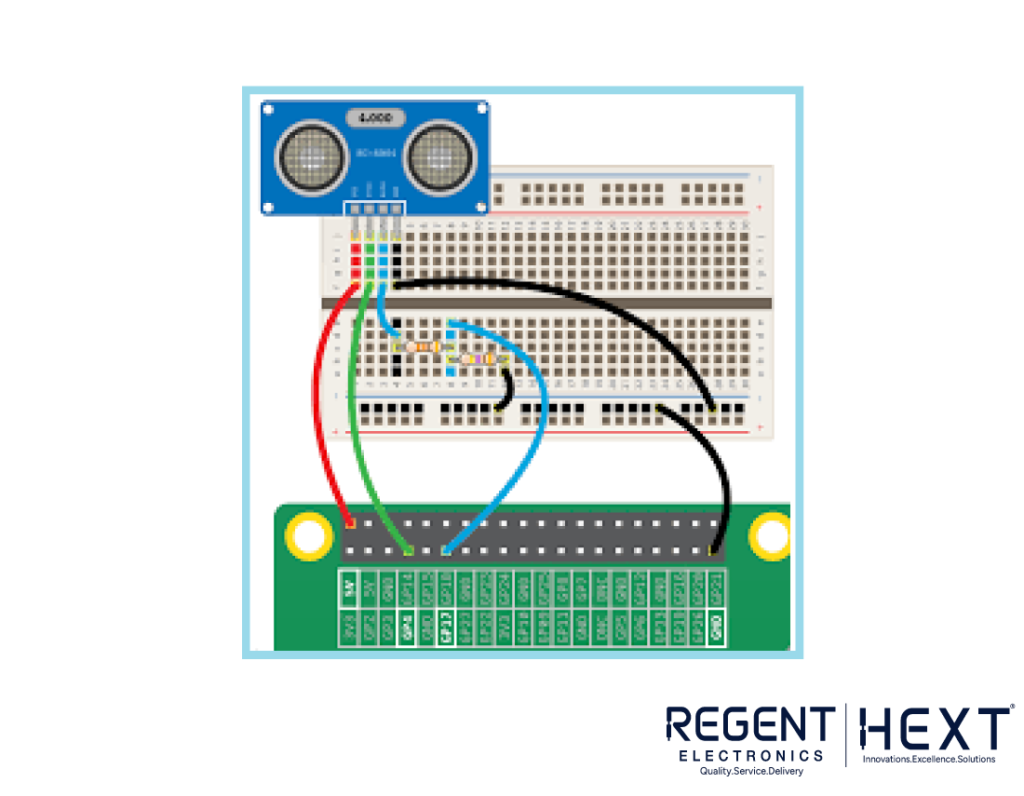
Wiring Connection
- VCC of the sensor connects to 5V on the Raspberry Pi.
- GND connects to the ground (GND) of the Raspberry Pi.
- TRIG connects to GPIO 11.
- ECHO connects to GPIO 18 via a voltage divider (to convert 5V to 3.3V).
Python Code for Ultrasonic Sensor
Now, let’s write a Python script to measure distance using the ultrasonic sensor.
import RPi.GPIO as GPIO
import time
# Set GPIO mode
GPIO.setmode(GPIO.BCM)
# Define GPIO pins
GPIO_TRIG = 11
GPIO_ECHO = 18
# Set up GPIO pins
GPIO.setup(GPIO_TRIG, GPIO.OUT)
GPIO.setup(GPIO_ECHO, GPIO.IN)
# Ensure TRIG is low initially
GPIO.output(GPIO_TRIG, GPIO.LOW)
time.sleep(2)
# Send ultrasonic pulse
GPIO.output(GPIO_TRIG, GPIO.HIGH)
time.sleep(0.00001)
GPIO.output(GPIO_TRIG, GPIO.LOW)
# Measure response time
while GPIO.input(GPIO_ECHO) == 0:
start_time = time.time()
while GPIO.input(GPIO_ECHO) == 1:
bounce_back_time = time.time()
# Calculate distance
pulse_duration = bounce_back_time – start_time
distance = round(pulse_duration * 17150, 2)
# Display result
print(f”Distance: {distance} cm”)
# Clean up GPIO
GPIO.cleanup()
Code Explanation
- Import Modules: RPi.GPIO is used to interact with Raspberry Pi’s GPIO pins, while time helps introduce delays.
- Set GPIO Mode: GPIO.setmode(GPIO.BCM) allows referencing GPIO pins using their Broadcom numbering.
- Initialize GPIO Pins: TRIG is set as an output, and ECHO as an input.
- Triggering the Sensor: A short pulse (10 microseconds) is sent to TRIG to initiate measurement.
- Measuring Response Time: The script records the time taken for the pulse to return.
- Calculating Distance: Using the speed of sound (34300 cm/s), the distance is computed.
- Cleanup: GPIO.cleanup() releases the used GPIO pins.
Conclusion
In this tutorial, we successfully interfaced an ultrasonic sensor with Raspberry Pi and measured distances using Python. This knowledge can be extended to projects like obstacle avoidance robots, automated parking systems, and IoT applications.
Stay tuned for our next tutorial on interfacing relay modules with Raspberry Pi GPIO!
For more tutorials and electronic components, visit Regent Electronics!