

PulseOxy: Building an IoT-based Pulse Oximeter with Seeed Studio XIAO ESP32C3, MAX30102, and OLED Display
Creating a smart pulse oximeter is an exciting and practical IoT project, allowing you to measure vital health parameters like Heart Rate (HR) and Blood Oxygen Saturation (SPO2). In this guide, we will show you how to build a PulseOxy device using the MAX30102 pulse oximeter sensor, Seeed Studio XIAO ESP32C3, and a 0.91-inch OLED display. This project also integrates with the Arduino Cloud for remote monitoring and data visualization.
What is Seeed Studio XIAO ESP32C3?
The Seeed Studio XIAO ESP32C3 is a compact development board powered by the ESP32-C3 chip. It is equipped with Bluetooth 5.0 and WiFi connectivity, making it a perfect choice for Internet of Things (IoT) applications. The ESP32-C3 features a 32-bit RISC-V processor with excellent performance for wireless communication and data processing.
Key features of the Seeed Studio XIAO ESP32C3 include:
- ✅ 32-bit RISC-V CPU running at up to 160 MHz
- ✅ WiFi and Bluetooth LE support (IEEE 802.11 b/g/n and Bluetooth 5.0)
- ✅ Low Power Consumption (43μA in deep sleep)
- ✅ 4MB Flash Memory and 400KB SRAM
- ✅ External Antenna for improved RF performance
- ✅ Small form factor (20 x 17.5 mm) – ideal for compact and wearable projects
The board is extremely versatile and can handle a range of IoT applications, including wearables, smart devices, and home automation systems.
Hardware and Software Requirements
Hardware:
- Seeed Studio XIAO ESP32C3 Board
- MAX30102 Pulse Oximeter and Heart Rate Sensor
- 0.91-inch OLED Display
- Jumper Wires and Breadboard
- 3D-Printed Enclosure
- Type-C Cable
Software:
- Arduino IDE
- Arduino Cloud
- Arduino IoT Remote App
- Arduino Create Agent
Circuit Diagram
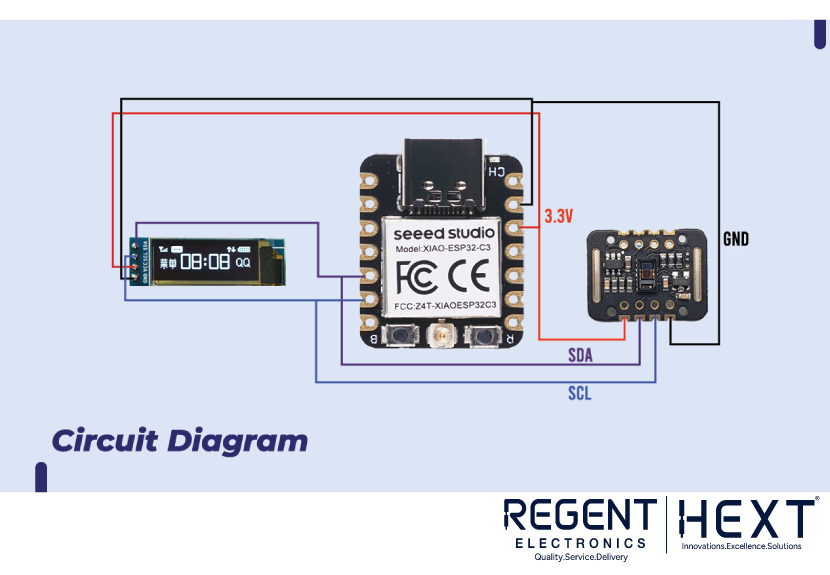

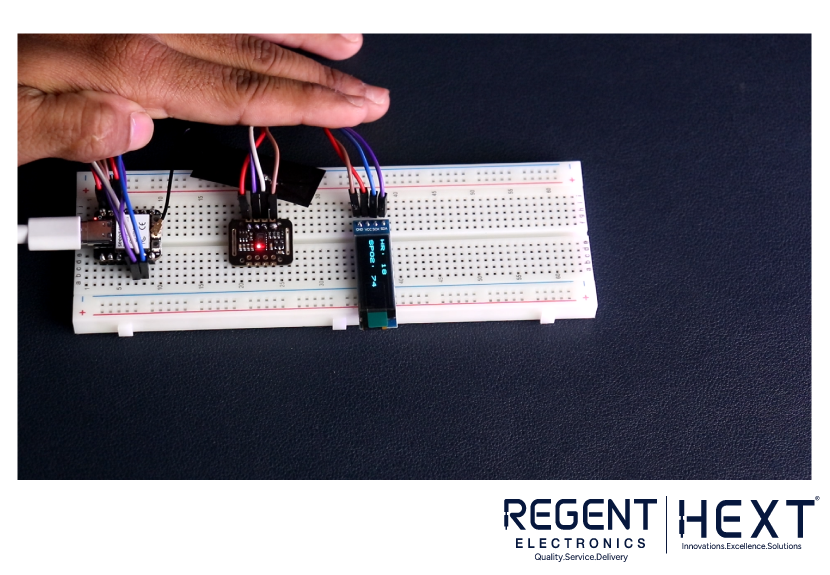
To get started, interface the MAX30102 sensor and OLED display with the Seeed Studio XIAO ESP32C3 as shown in the circuit diagram. Connect the components using jumper wires on a breadboard.
Setting Up the Arduino IDE and Libraries
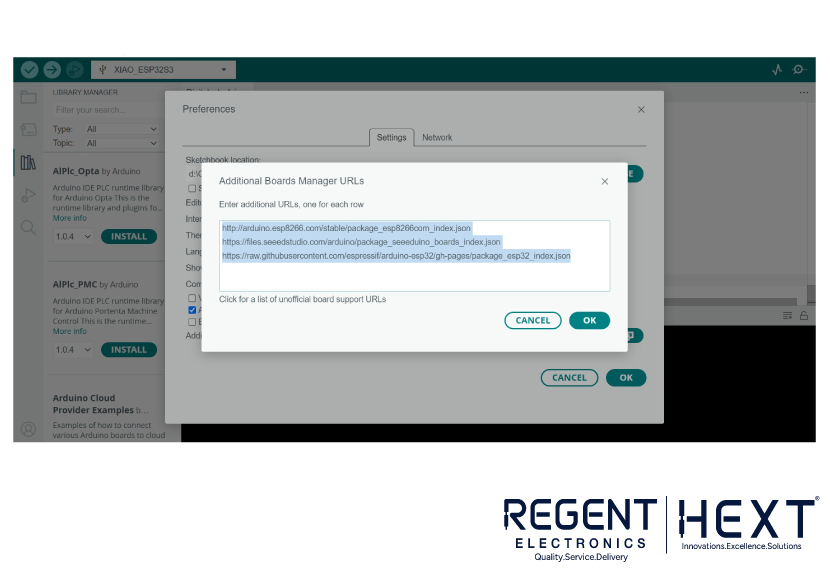
- Open the Arduino IDE and add the following URLs in File > Preferences under “Additional Board Manager URLs”:
- http://arduino.esp8266.com/stable/package_esp8266com_index.json
- https://files.seeedstudio.com/arduino/package_seeeduino_boards_index.json
- https://raw.githubusercontent.com/espressif/arduino-esp32/gh-pages/package_esp32_index.json
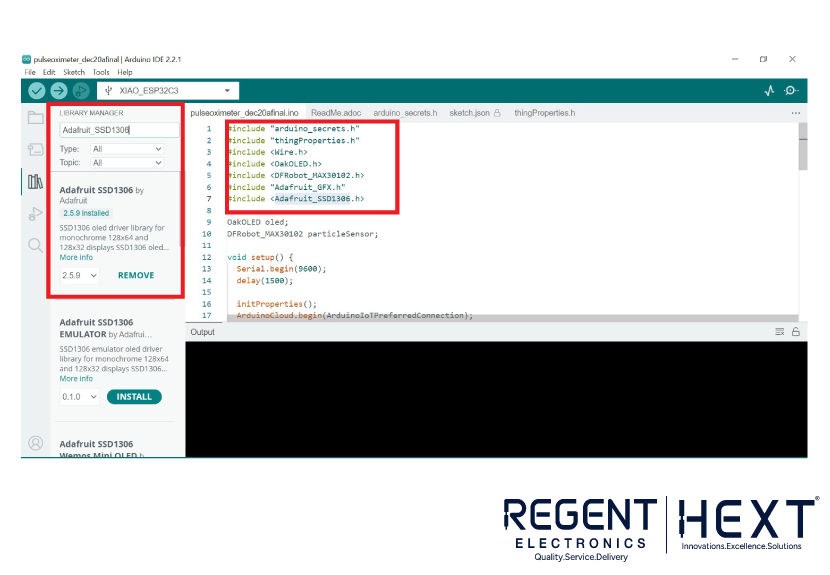
- Install the necessary libraries via Sketch > Include Library > Manage Libraries:
- OakOLED
- DFRobot_MAX30102
- Adafruit_GFX
- Adafruit_SSD1306
Integrating Arduino Cloud
To connect your project to the Arduino Cloud, follow these steps:
- Create a Thing on the Arduino Cloud platform.
- Configure the network settings and create a dashboard.
- Link the Heart Rate and SPO2 variables to the cloud.
Next, open the Arduino Cloud sketch editor, select your variables, and adjust the code to match your sensor readings.
Writing the Code
Here is the core code for the PulseOxy project:
cpp
CopyEdit
#include “arduino_secrets.h”
#include “thingProperties.h”
#include <Wire.h>
#include <OakOLED.h>
#include <DFRobot_MAX30102.h>
#include “Adafruit_GFX.h”
#include <Adafruit_SSD1306.h>
OakOLED oled;
DFRobot_MAX30102 particleSensor;
void setup() {
Serial.begin(9600);
delay(1500);
initProperties();
ArduinoCloud.begin(ArduinoIoTPreferredConnection);
setDebugMessageLevel(2);
ArduinoCloud.printDebugInfo();
oled.begin();
while (!particleSensor.begin()) {
Serial.println(“MAX30102 was not found”);
delay(1000);
}
particleSensor.sensorConfiguration(50, SAMPLEAVG_4, MODE_MULTILED, SAMPLERATE_100, PULSEWIDTH_411, ADCRANGE_16384);
}
void loop() {
ArduinoCloud.update();
int32_t SPO2;
int8_t SPO2Valid;
int32_t heartRate;
int8_t heartRateValid;
Serial.println(F(“Wait about four seconds”));
particleSensor.heartrateAndOxygenSaturation(&SPO2, &SPO2Valid, &heartRate, &heartRateValid);
// Display results on OLED
oled.clearDisplay();
oled.setTextSize(2);
oled.setTextColor(SSD1306_WHITE);
oled.setCursor(0, 0);
oled.print(F(“HR: “));
oled.print(heartRate);
oled.setCursor(0, 40);
oled.print(F(“SPO2: “));
oled.print(SPO2);
oled.display();
// Update Arduino IoT Cloud variables
hR = heartRate;
sPO2 = SPO2;
delay(2000); // Adjust the delay as needed
}
Upload the code to the Seeed Studio XIAO ESP32C3, ensuring that your Wi-Fi credentials and device secret key are correctly configured.
Debugging and Testing
Once the code is uploaded:
- Check that your Wi-Fi is connected to the device.
- Ensure that the MAX30102 sensor is reading data and the OLED display shows the Heart Rate and SPO2 values.
- The data will be sent to the Arduino Cloud, where you can view it on your dashboard.
For improved accuracy, consider using high-quality sensors like DFRobot MAX30102 or SparkFun MAX30102 for more reliable readings.
3D Printing the Enclosure

To make the device portable, you can 3D print a custom case for the PulseOxy. Download the necessary STL files:
- Top: Download STL
- Panel: Download STL
- Bottom: Download STL
- Hinge: Download STL
Once printed, assemble the components inside the 3D case and connect the wires as per the circuit diagram.
Final Testing

After assembling the hardware inside the 3D-printed case, power on the device. The PulseOxy will display the Heart Rate and SPO2 values on the OLED display. The data will be sent to the Arduino Cloud, where you can view real-time updates on your dashboard or the Arduino IoT Remote App.
Conclusion
With the PulseOxy project, you’ve created a smart IoT pulse oximeter that measures and displays Heart Rate and SPO2 on an OLED display. By integrating with the Arduino Cloud, you can monitor these vital signs remotely. This project is a great example of how you can build affordable, IoT-based health monitoring devices using Seeed Studio XIAO ESP32C3, MAX30102, and Arduino Cloud.