
What is Infill in 3D Printing? A Detailed Beginner’s Guide by Regent Electronics
Infill plays a crucial role in 3D printing, directly affecting the strength, weight, structure, material usage, and print time of any object. Whether you’re printing a prototype, a functional tool, or a decorative model, the infill pattern and density you choose will determine the performance and durability of your print.
In this detailed guide from Regent Electronics, we’ll explore what infill is, the most common types of infill patterns, and how to choose the right infill density for your 3D printing projects.
🧱 What is Infill in 3D Printing?

Infill refers to the internal structure of a 3D printed object. While the outer shell (or perimeter) creates the external shape, infill occupies the space within, providing internal support. Infill settings are defined in your slicer software during the preparation of your 3D model, and these settings can drastically influence the final print’s properties.
There are two key parameters to understand:
- Infill Pattern – the shape or geometry of the internal structure
- Infill Density – the percentage of the internal volume that is filled
Let’s dive deeper into both aspects.
🧩 Common 3D Printing Infill Patterns
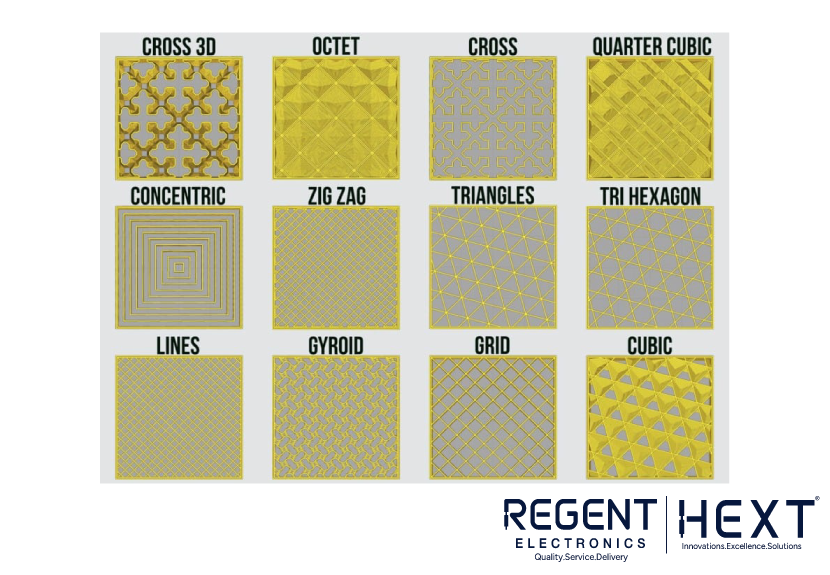
1. Lines
A fast and lightweight pattern where parallel lines are printed layer-by-layer in alternating directions. It offers minimal strength but is great for quick, low-cost prints.
2. Grid
A two-dimensional crisscross pattern that provides strength in both X and Y axes. It’s a good balance between speed, strength, and material usage.
3. Triangles
This infill pattern creates a mesh of triangular shapes that offer strong two-dimensional support, making it a solid choice for structural prints.
4. Tri-Hexagon
Combines triangles and hexagons in a single pattern. It offers enhanced 2D strength and a neat internal appearance, making it ideal for load-bearing parts.
5. Honeycomb
Visually appealing and structurally effective, this pattern mimics natural honeycomb structures and is commonly used for its balance of strength and weight.
6. Cubic
A three-dimensional structure made of cubes tilted at 45° angles. It offers excellent strength in all directions, suitable for parts needing durability.
7. Octet
Similar to cubic but with square-based geometry. It provides full 3D strength and is used in engineering-grade prints.
8. Gyroid
A complex, wave-like structure that offers excellent strength-to-weight ratio. It prints efficiently and evenly distributes stress, making it ideal for functional parts.
9. Concentric
Forms rings that match the part’s outer shape. Great for flexible prints (like TPU) and uses minimal material, though not very strong structurally.
📊 What is Infill Density?
Infill density refers to how much of the internal volume is filled with material. It’s usually defined as a percentage from 0% (completely hollow) to 100% (completely solid).
💡 Effects of Infill Density:
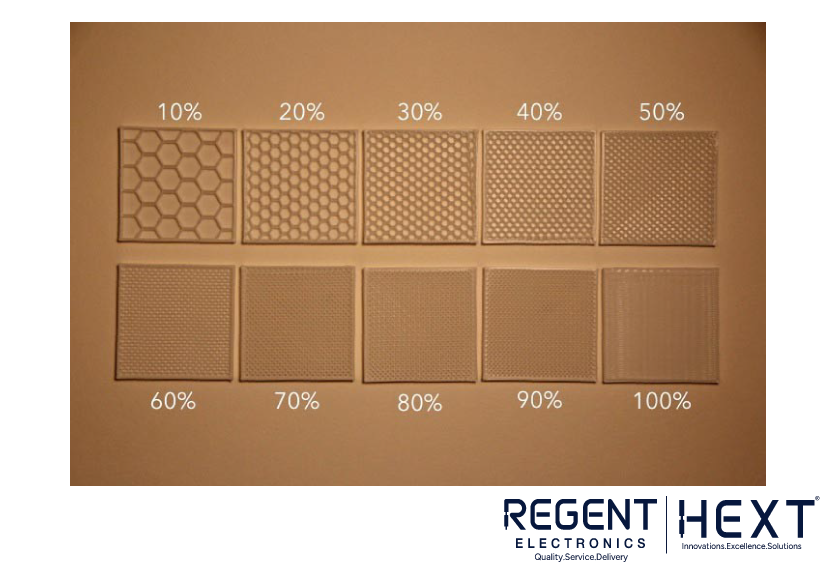
- 0–15%: Lightweight and fast prints (ideal for figurines and decorative parts)
- 15–50%: Standard usage for general-purpose models (balanced strength and speed)
- 50–100%: Stronger parts for mechanical use (more material, longer print times)
Note: Higher infill = more material and longer printing times, but stronger and heavier parts. Flexible materials become less bendable at higher infill percentages.
🔀 Variable Infill Density
Advanced slicer settings let you adjust infill density in different sections of the same model. This is useful for parts that need extra strength in specific areas while reducing material in less critical zones.
🛠️ Why Infill Matters in 3D Printing
Infill affects more than just strength:
- Weight: Lower infill means lighter parts.
- Print Time: Sparse infill reduces print time.
- Material Cost: Less infill = less filament used.
- Buoyancy: Important for objects used in water.
- Mechanical Properties: Influences flexibility and durability.
For example, a decorative model can be printed with low infill to save time and material, while a functional mechanical component may require high infill for strength and load-bearing capability.
✅ Best Infill Settings by Use Case
| Use Case | Recommended Infill | Purpose |
| Display models | 0–15% | Lightweight, minimal material |
| Everyday objects | 15–50% | Balance of strength and efficiency |
| Functional mechanical parts | 50–100% | Maximum strength and durability |
| Flexible prints (TPU) | 10–25% | More flexibility with less density |
📦 Final Thoughts
Understanding how infill works is key to getting the most out of your 3D printer. By adjusting infill patterns and density, you can optimize your prints for speed, strength, material savings, and specific functional needs.
Want to bring your 3D models to life?
🚀 Try Regent Electronics’ Online 3D Printing Service
Upload your design, get an instant quote, and we’ll deliver your custom 3D-printed parts anywhere in India — fast, reliable, and affordable.