

How to Make an Automatic Hand Sanitizer Dispenser Using Arduino – DIY Guide
Introduction
In this tutorial, you will learn how to create your own automatic hand sanitizer dispenser using an Arduino board. Given the importance of hygiene, especially in the wake of contagious diseases like COVID-19, an automated sanitizer dispenser minimizes contact and reduces the risk of infection.
By following this step-by-step guide, you can design a touchless sanitizer system for homes, hospitals, and workplaces. Let’s get started!
Required Components
Hardware
- Ultrasonic Sensor / IR Sensor
- Arduino Nano / Arduino Uno
- Relay Module (1-Channel / 2-Channel)
- DC Water Pump
- Sanitizer Container
- Water Valve
- Power Source
Software
- Arduino IDE
How Does a Hand Sanitizer Work?
A standard hand sanitizer dispenser operates by pressing a pump to release sanitizer. However, this contact-based mechanism increases the risk of spreading infections. Our automatic sanitizer dispenser will use sensors to detect hands and release sanitizer without physical contact.
Working Principle of an Automatic Hand Sanitizer Dispenser
Our design consists of a sensor to detect hand presence, an Arduino board to process the signal, and a relay module to control the sanitizer pump.
- Detecting Hands: We use an ultrasonic or IR sensor to detect when a hand is near the dispenser.
- Triggering the Pump: Once a hand is detected, the Arduino activates the relay module.
- Dispensing Sanitizer: The relay powers the DC pump, which releases sanitizer.
Choosing the Right Sensor
1. Ultrasonic Sensor
An ultrasonic sensor transmits sound waves and measures the time taken for them to reflect back. If the sensor detects a hand within a certain range, it triggers the pump.
Wiring an Ultrasonic Sensor with Arduino

- Trigger Pin → Arduino D3
- Echo Pin → Arduino D2
Arduino Code for Ultrasonic Sensor
const int trigPin = 3;
const int echoPin = 2;
long duration;
int distance;
void setup() {
pinMode(trigPin, OUTPUT);
pinMode(echoPin, INPUT);
Serial.begin(9600);
}
void loop() {
digitalWrite(trigPin, LOW);
delayMicroseconds(2);
digitalWrite(trigPin, HIGH);
delayMicroseconds(10);
digitalWrite(trigPin, LOW);
duration = pulseIn(echoPin, HIGH);
distance = duration * 0.034 / 2;
Serial.print(“Distance: “);
Serial.println(distance);
}
2. IR Sensor
An IR sensor detects objects by emitting infrared light and measuring its reflection. If an object (hand) is detected, it triggers the pump.
Wiring an IR Sensor with Arduino
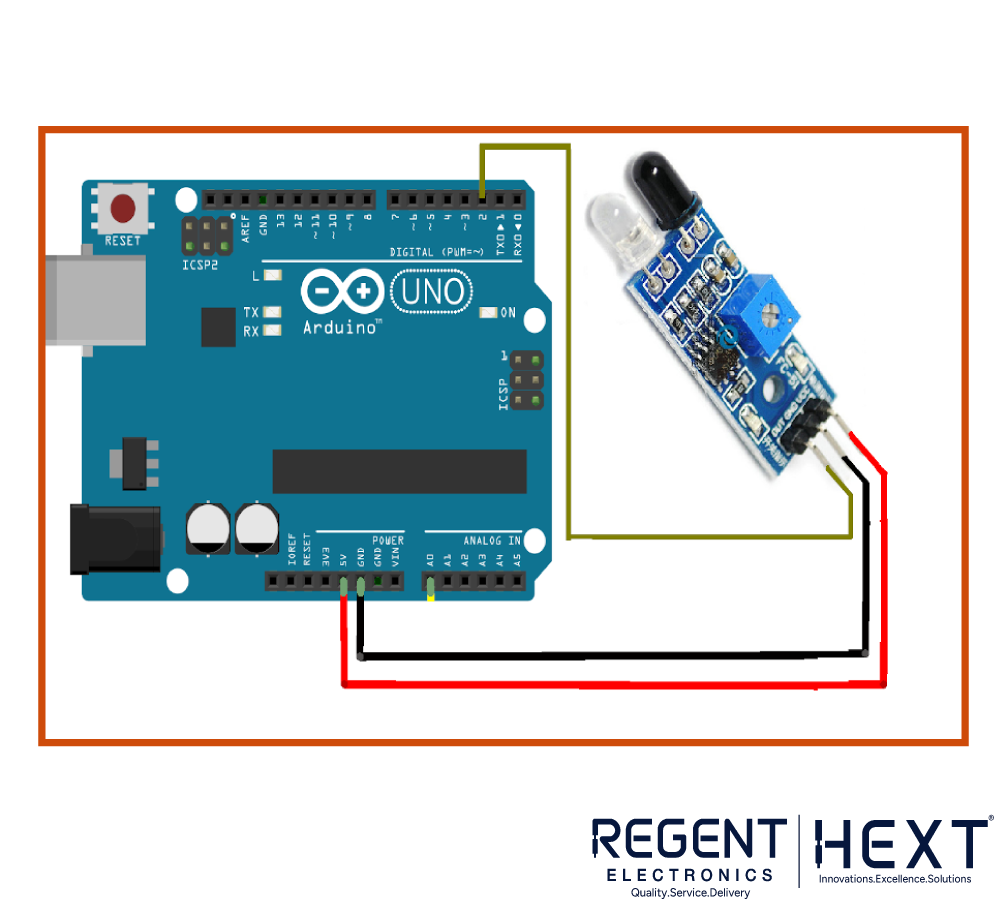
- IR Sensor Output → Arduino D2
Arduino Code for IR Sensor
#define IRsensor 2
void setup() {
pinMode(IRsensor, INPUT);
Serial.begin(9600);
}
void loop() {
int readPin = digitalRead(IRsensor);
Serial.print(“IR Sensor Output = “);
Serial.println(readPin);
delay(200);
}
Connecting the Pump Using a Relay Module
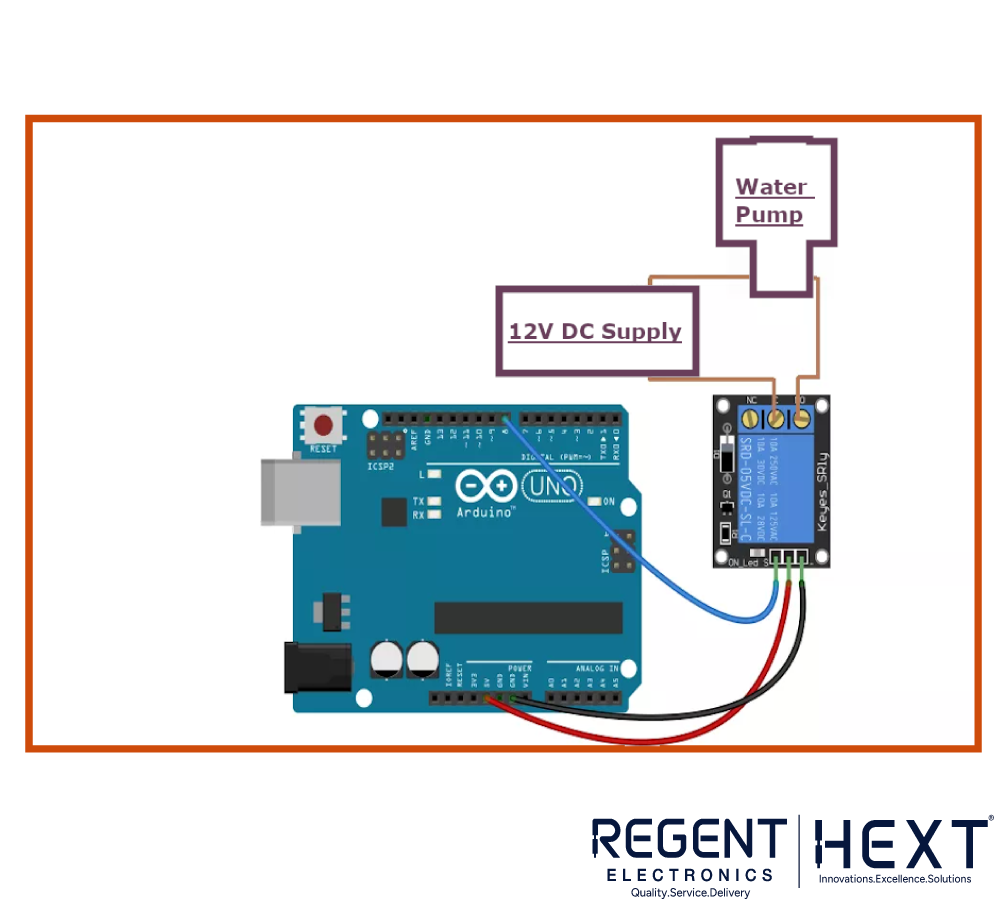
Since the Arduino can only provide 5V, a relay module is used to power the 12V DC water pump.
Wiring a Relay Module with Arduino
- Relay Module IN → Arduino D7
Arduino Code for Relay Control
#define DCwater_pump 8
void setup() {
pinMode(DCwater_pump, OUTPUT);
Serial.begin(9600);
}
void loop() {
digitalWrite(DCwater_pump, HIGH);
Serial.println(“DC Pump is ON Now!!”);
delay(500);
digitalWrite(DCwater_pump, LOW);
Serial.println(“DC Pump is OFF Now!!”);
delay(500);
}
Complete Arduino Code for Automatic Hand Sanitizer
Using IR Sensor
#define IRsensor 2
#define DCwater_pump 8
void setup() {
pinMode(IRsensor, INPUT);
pinMode(DCwater_pump, OUTPUT);
Serial.begin(9600);
}
void loop() {
int readPin = digitalRead(IRsensor);
if (readPin == HIGH) {
digitalWrite(DCwater_pump, HIGH);
Serial.println(“DC Pump is ON Now!!”);
delay(500);
} else {
digitalWrite(DCwater_pump, LOW);
Serial.println(“DC Pump is OFF Now!!”);
delay(500);
}
}
Using Ultrasonic Sensor
const int trigPin = 3;
const int echoPin = 2;
#define DCwater_pump 8
long duration;
int distance;
void setup() {
pinMode(trigPin, OUTPUT);
pinMode(echoPin, INPUT);
pinMode(DCwater_pump, OUTPUT);
Serial.begin(9600);
}
void loop() {
digitalWrite(trigPin, LOW);
delayMicroseconds(2);
digitalWrite(trigPin, HIGH);
delayMicroseconds(10);
digitalWrite(trigPin, LOW);
duration = pulseIn(echoPin, HIGH);
distance = duration * 0.034 / 2;
Serial.print(“Distance: “);
Serial.println(distance);
if (distance < 30) {
digitalWrite(DCwater_pump, HIGH);
Serial.println(“DC Pump is ON Now!!”);
delay(500);
} else {
digitalWrite(DCwater_pump, LOW);
Serial.println(“DC Pump is OFF Now!!”);
delay(500);
}
}
Conclusion
Congratulations! You have successfully built an automatic hand sanitizer dispenser using Arduino. This project helps in maintaining hygiene by reducing contact with surfaces.
If you have any questions, feel free to ask in the comments section. Stay tuned for our next tutorial on how to build a DIY IR Thermometer Gun using an Arduino board!