
Interfacing ACS712 Current Sensor with Arduino – Step-by-Step Guide to Measure Current
In this tutorial, we will explore the ACS712 current sensor, its working principle, and how to interface it with an Arduino to measure current efficiently.
What is ACS712 Current Sensor?
The ACS712 is a Hall Effect-based linear current sensor capable of measuring both DC (Direct Current) and AC (Alternating Current). It offers high accuracy and electrical isolation, making it ideal for various power monitoring applications.
Features of ACS712 Current Sensor:
- Measures AC & DC current
- Available in three variants: ±5A, ±20A, and ±30A
- High sensitivity: 66 to 185 mV/A
- 80kHz bandwidth
- Low-noise analog signal output
- Near-zero magnetic hysteresis
- Internal conductor resistance: 1.2 mΩ
Working Principle of ACS712 Current Sensor
The ACS712 sensor operates using the Hall Effect principle. A Hall sensor embedded within the IC detects the magnetic field generated by the current passing through the internal copper conductor. This field is then converted into a proportional voltage output, which can be read by a microcontroller such as an Arduino.
Interfacing ACS712 Current Sensor with Arduino
To measure current, we will interface the ACS712 current sensor with an Arduino. Below is the list of required components:
Required Components:
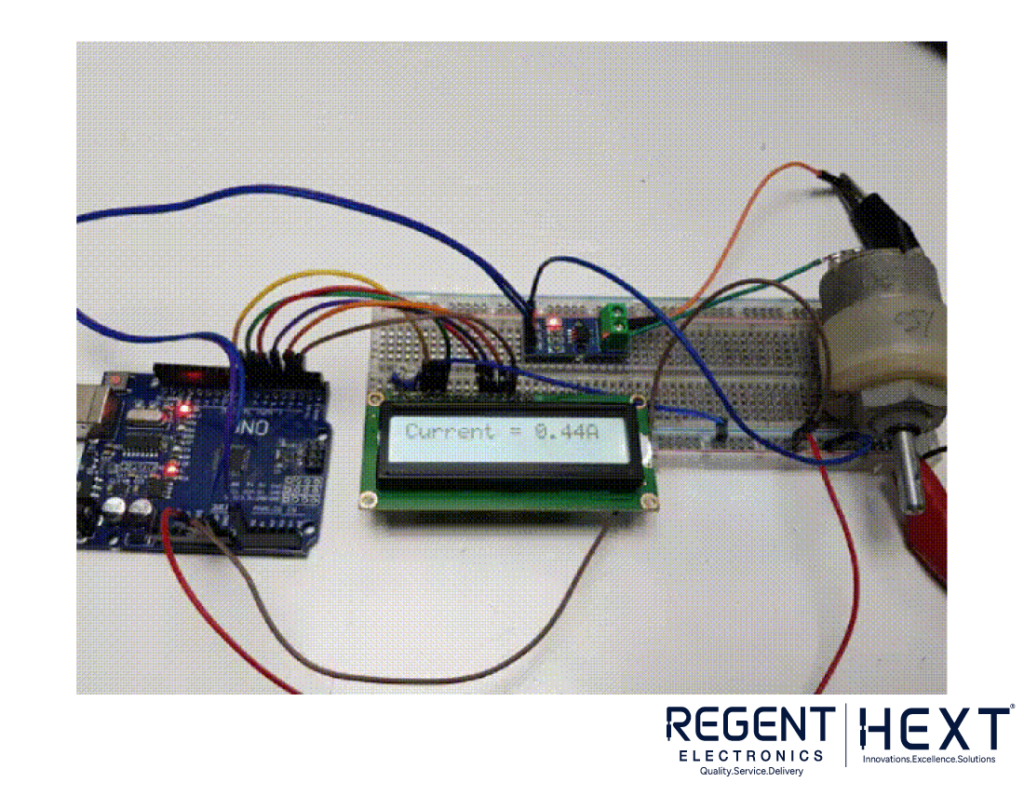
- Arduino Uno
- ACS712 Current Sensor
- 12V DC Motor (Load)
- LCD1602 Parallel LCD Display
- 10k Potentiometer
- Power Supply
- Jumper Wires
Circuit Connection:

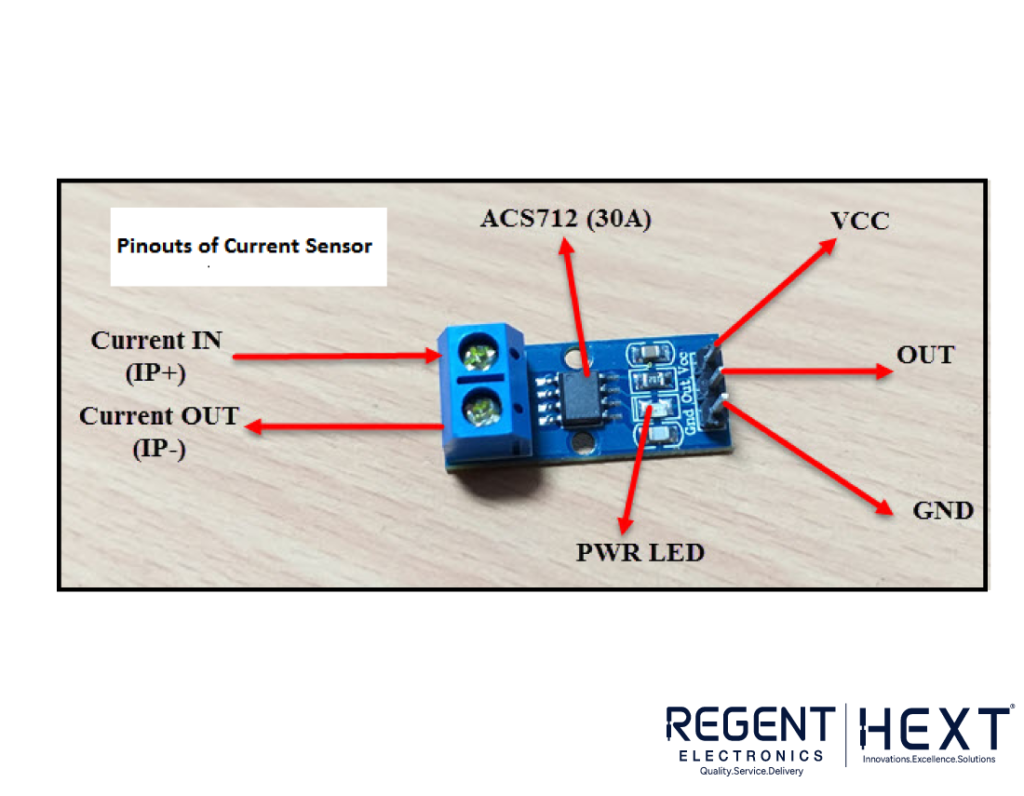
- Connect the VCC pin of the ACS712 to the 5V pin of the Arduino.
- Connect the GND pin of the sensor to the GND of the Arduino.
- Connect the OUT pin of ACS712 to the A0 analog pin of the Arduino.
- Connect the 12V DC motor to the load terminals.
- Set up the LCD1602 display for output visualization.
Arduino Code for ACS712 Current Measurement
#include <LiquidCrystal.h>
LiquidCrystal lcd(7, 6, 5, 4, 3, 2);
const int currentPin = A0;
int sensitivity = 66;
int adcValue= 0;
int offsetVoltage = 2500;
double adcVoltage = 0;
double currentValue = 0;
void setup()
{
Serial.begin(9600);
lcd.begin(16, 2);
lcd.print(” Current Sensor “);
lcd.setCursor(0,1);
lcd.print(” with Arduino “);
delay(2000);
}
void loop()
{
adcValue = analogRead(currentPin);
adcVoltage = (adcValue / 1024.0) * 5200;
currentValue = ((adcVoltage – offsetVoltage) / sensitivity);
Serial.print(“Raw Sensor Value = ” );
Serial.print(adcValue);
lcd.clear();
delay(1000);
lcd.setCursor(0,0);
lcd.print(“ADC Value = “);
lcd.setCursor(12,0);
lcd.print(adcValue);
delay(2000);
Serial.print(“\t Voltage(mV) = “);
Serial.print(adcVoltage,3);
lcd.setCursor(0,0);
lcd.print(“V in mV = “);
lcd.setCursor(10,0);
lcd.print(adcVoltage,1);
delay(2000);
Serial.print(“\t Current = “);
Serial.println(currentValue,3);
lcd.setCursor(0,0);
lcd.print(“Current = “);
lcd.setCursor(10,0);
lcd.print(currentValue,2);
lcd.setCursor(14,0);
lcd.print(“A”);
delay(2500);
}
Applications of ACS712 Current Sensor
The ACS712 sensor is widely used in various applications, such as:
- Power monitoring in electrical appliances
- Battery chargers to measure charging current
- Inverters and SMPS (Switched Mode Power Supplies)
- Industrial automation for current sensing
- Overcurrent fault detection
Conclusion
In this guide, we explored the working principle of the ACS712 current sensor and demonstrated its interfacing with an Arduino to measure current. By following this tutorial, you can efficiently monitor current consumption in various applications. If you have any queries, feel free to leave a comment below!