
Arduino Nano Board: Pinout & Programming Guide
Arduino boards have become a staple in the world of electronics, with numerous variants designed to meet diverse needs and applications. Among them, the Arduino Nano stands out as one of the most popular and versatile options. This small and compact board offers a blend of reliability and flexibility, making it ideal for a range of electronic projects.
In this guide, we’ll dive into the key features of the Arduino Nano board, its pinout configuration, technical specifications, and how to get started with programming it.
What is the Arduino Nano?

The Arduino Nano is a tiny, breadboard-friendly development board based on the ATmega328P microcontroller (Arduino Nano 3.0) or ATmega168 (Arduino Nano 2.x). It offers almost the same functionality as the larger Arduino UNO, but in a much more compact package. The Nano board is perfect for projects where size and portability are crucial.
Despite its small size, the Arduino Nano comes with a full range of features, including digital and analog I/O pins, PWM support, and communication protocols like SPI, I2C, and UART. However, it lacks a DC power jack and instead uses a Mini-B USB cable for power and programming.
Key Features of the Arduino Nano
- Compact size: Perfect for projects where space is limited.
- ATmega328P microcontroller: Same as Arduino UNO, ensuring compatibility with the Arduino ecosystem.
- Digital and analog I/O pins: Offers flexibility in connecting various sensors and components.
- USB interface: Simplifies programming via Mini-B USB cable.
- PWM and communication support: Provides capabilities for more complex projects.
Arduino Nano Technical Specifications
Here’s a quick overview of the key specifications of the Arduino Nano:
- Microcontroller: ATmega328P
- Operating Voltage: 5V (input range: 7V–12V)
- Clock Speed: 16 MHz
- Digital I/O Pins: 14 (6 PWM)
- Analog Input Pins: 8
- Flash Memory: 32 KB (2 KB used by bootloader)
- SRAM: 2 KB
- EEPROM: 1 KB
- PWM Pins: 6 (pins 3, 5, 6, 9, 10, 11)
- Communication Protocols: I2C, SPI, Serial
- Power Pins: 5V, 3.3V, and GND
- USB Port: Mini-B USB for uploading code
Pinout Configuration of Arduino Nano
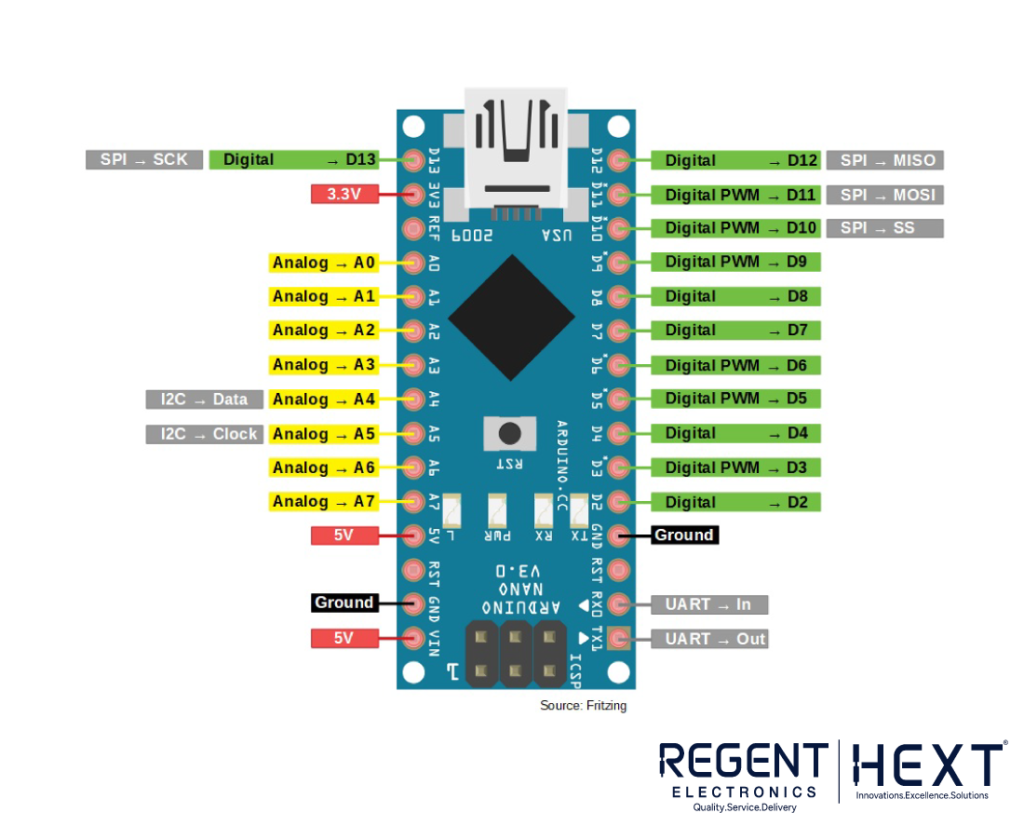
The Arduino Nano comes with several pins for various functions, making it ideal for a wide range of applications. Here’s a breakdown of the key pins:
- Power Pins:
- Vin: Input voltage (7V-12V when using an external power source)
- 5V: Regulated 5V power supply output for components
- 3.3V: Minimum voltage provided by the onboard regulator
- GND: Ground pin
- Reset Pin (RST): Used to reset the microcontroller.
- Analog Pins (A0 to A7): Used for reading analog signals ranging from 0V to 5V.
- Digital I/O Pins (D0 to D13): Used as input or output pins for various digital signals.
- Serial Pins (Tx, Rx): Used for transmitting and receiving serial data.
- External Interrupts (2, 3): Pins used to trigger interrupts for more complex operations.
- PWM Pins (3, 5, 6, 9, 11): Pins that generate Pulse Width Modulation output for controlling devices like motors or LEDs.
- SPI Pins (10, 11, 12, 13): Pins used for SPI communication.
- I2C Pins (A4, A5): Pins used for TWI communication.
- AREF Pin: Provides a reference voltage for the analog inputs.
Arduino Nano Programming
Programming the Arduino Nano is straightforward and similar to programming other Arduino boards. You can write your code using the official Arduino IDE, which is available for various operating systems. Here’s how you can get started:
- Download the Arduino IDE: Visit the official Arduino website and download the appropriate version of the IDE for your operating system.
- Connect the Arduino Nano: Use a Mini-B USB cable to connect the Arduino Nano to your computer.
- Select the Board and Port: In the Arduino IDE, go to Tools > Board > Arduino Nano and choose the correct port under Tools > Port.
- Write and Upload Code: Load the example code (e.g., “Blink”) from File > Examples > Basics > Blink, and click the upload button.
After uploading, you should see the onboard LED blinking.
Example Code: Blinking LED
cpp
CopyEdit
// Setup function runs once when you press reset or power the board
void setup() {
// Initialize the digital pin as an output
pinMode(LED_BUILTIN, OUTPUT);
}
// Loop function runs repeatedly
void loop() {
digitalWrite(LED_BUILTIN, HIGH); // Turn the LED on (HIGH is the voltage level)
delay(1000); // Wait for 1000 milliseconds
digitalWrite(LED_BUILTIN, LOW); // Turn the LED off (LOW is the voltage level)
delay(1000); // Wait for 1000 milliseconds
}
Applications of Arduino Nano
The Arduino Nano is widely used in a variety of applications, including:
- DIY Robotics Projects: Ideal for small robots or autonomous systems.
- Prototyping: Perfect for prototyping electronics systems and products.
- Automation and Control Systems: Suitable for controlling motors, lights, or sensors in automation systems.
- Education and Learning: A great tool for beginners learning about electronics and programming.
- IoT Projects: Can be integrated with sensors and other devices for Internet of Things (IoT) applications.
Why Choose the Arduino Nano?
The Arduino Nano is one of the most compact and cost-effective options in the Arduino family. Its small size makes it a go-to choice for projects where space is limited. However, for larger projects that require more input/output operations or complex code, it may be better to opt for a larger board like the Arduino Uno.
Conclusion
The Arduino Nano is a fantastic microcontroller board for small projects, prototyping, and learning. Its small form factor, compatibility with the Arduino ecosystem, and flexibility make it a popular choice among hobbyists and professionals alike.
If you’re looking to start a new project or dive into Arduino development, the Arduino Nano is an excellent choice for a wide range of applications.
For more details, tips, and resources on Arduino projects, visit Regent Electronics—your trusted source for Arduino boards and accessories.