
Interfacing an Optical Fingerprint Sensor with Arduino: A Step-by-Step Guide
Enhance security with a biometric access control system by integrating an optical fingerprint sensor with Arduino. This guide walks you through the entire process, ensuring a seamless setup.
Table of Contents
- What is a Fingerprint Sensor?
- Why Use a Fingerprint Sensor?
- Understanding Optical Fingerprint Sensors
- Advantages of Optical Fingerprint Sensors
- Applications of Optical Fingerprint Sensors
- How to Interface an Optical Fingerprint Sensor with Arduino
- Hardware Requirements
- Software Requirements
- Circuit Diagram
- Assembly Guide
- Working Mechanism
- Source Code
- Conclusion
What is a Fingerprint Sensor?
A fingerprint sensor captures and verifies a person’s fingerprint against a stored database. Widely used in smartphones, laptops, and biometric security systems, it offers an efficient and secure authentication method.
Why Use a Fingerprint Sensor?
Fingerprint authentication provides enhanced security, eliminating the need for passwords and PINs. Since fingerprints are unique to individuals, they offer a high level of protection against unauthorized access.
Understanding Optical Fingerprint Sensors
An optical fingerprint sensor utilizes optical imaging technology to capture and digitize a fingerprint pattern. It is one of the most commonly used biometric authentication methods due to its accuracy and ease of use.
Advantages of Optical Fingerprint Sensors
- Cost-Effective: More affordable compared to capacitive and ultrasonic sensors.
- Easy Integration: Compatible with various electronic devices.
- High Durability: Resistant to wear and tear, ensuring long-term reliability.
Applications of Optical Fingerprint Sensors
- Attendance tracking systems
- Secure access control in buildings
- Digital payment authentication
- Identity verification in financial institutions
How to Interface an Optical Fingerprint Sensor with Arduino
In this tutorial, we will build a simple access control system using an optical fingerprint sensor and an Arduino Nano.
Hardware Requirements
- R307 Optical Fingerprint Sensor
- Servo Motor
- Arduino Nano
- Jumper Wires
- OLED Display
- LEDs
- Buzzer
Software Requirements
- Arduino IDE
Circuit Diagram & Assembly
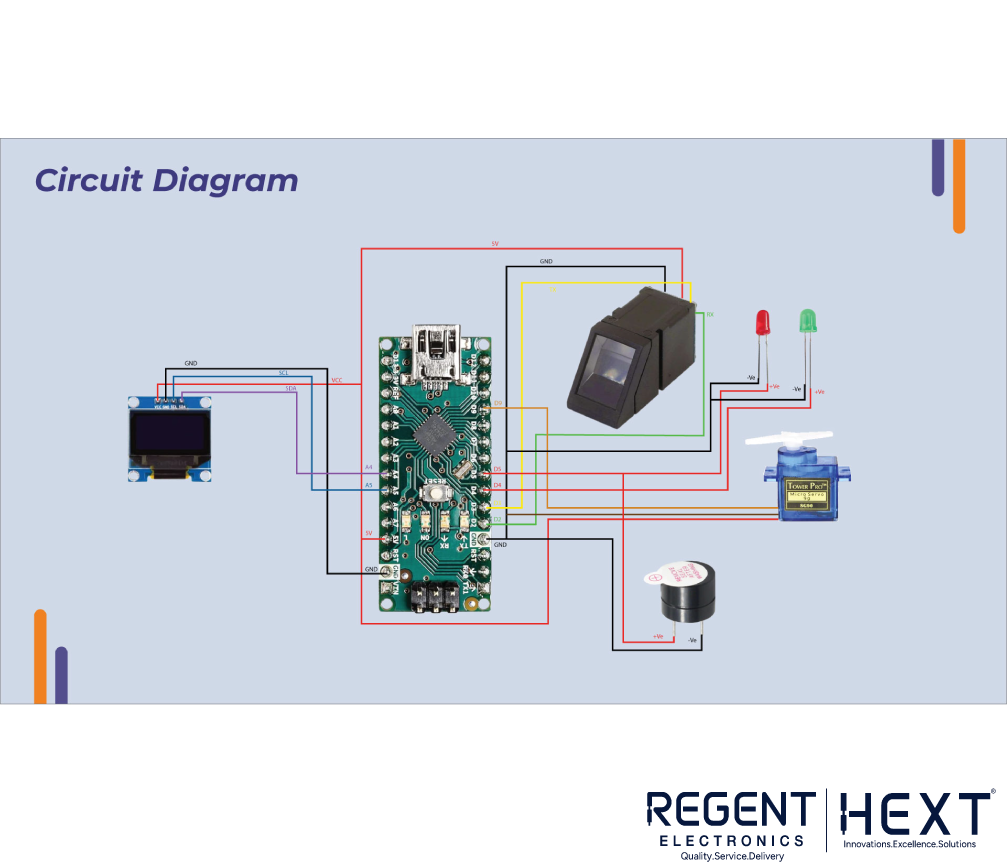
Optical Sensor to Arduino Connection
| Optical Sensor Wire | Arduino Nano Pin |
| Black (GND) | GND |
| Red (VCC) | 5V |
| Yellow (TX) | Pin D3 |
| Green (RX) | Pin D2 |
OLED Display to Arduino Connection
| OLED Pin | Arduino Nano Pin |
| SDA | A4 |
| SCL | A5 |
| VCC | 5V |
| GND | GND |
Servo Motor to Arduino Connection
| Servo Wire | Arduino Nano Pin |
| Red | 5V |
| Brown | GND |
| Orange | Pin D9 |
Working Mechanism
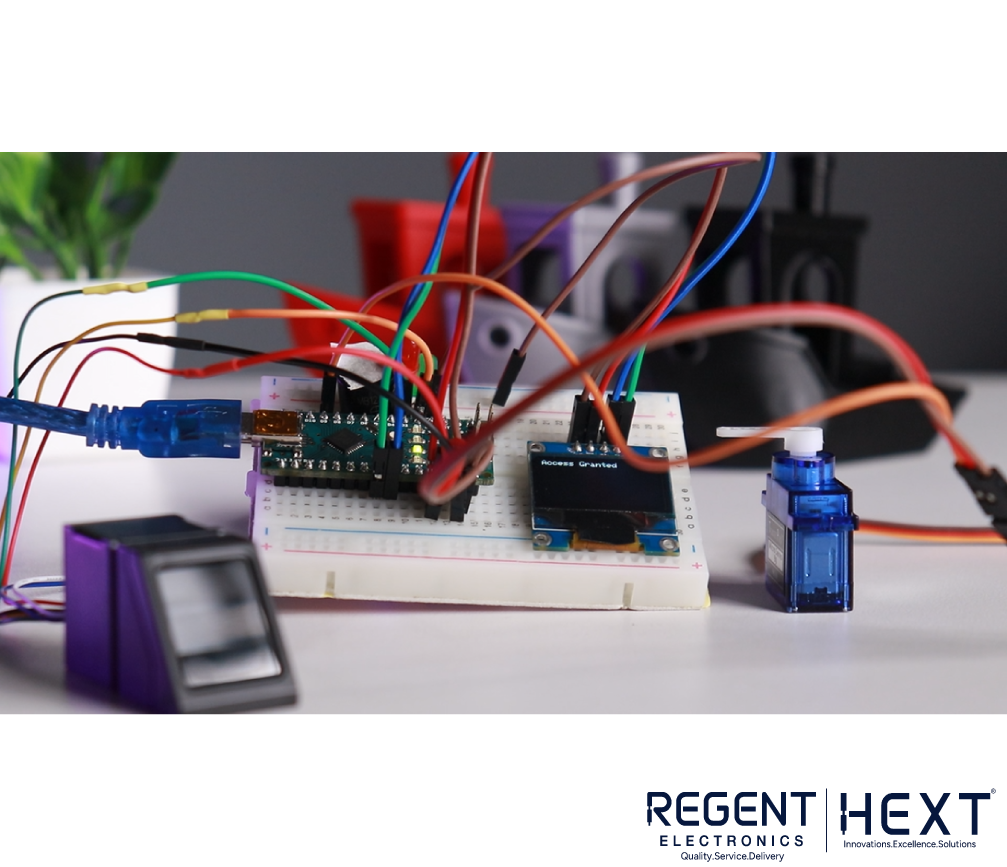
- Assemble the hardware components as per the circuit diagram.
- Open Arduino IDE and upload the enrollment code from the Adafruit Fingerprint Sensor Library.
- Register fingerprints by placing your finger on the sensor, assigning an ID.
- Upload the access control code.
- When a registered fingerprint is scanned, the green LED lights up, the servo motor unlocks access, and an entry is granted.
- If an unregistered fingerprint is detected, the red LED lights up, a buzzer sounds, and access is denied.
Source Code
#include <Adafruit_Fingerprint.h>
#include <Wire.h>
#include <Adafruit_GFX.h>
#include <Adafruit_SSD1306.h>
#include <Servo.h>
#define SCREEN_WIDTH 128
#define SCREEN_HEIGHT 64
#define OLED_RESET -1
Adafruit_SSD1306 display(SCREEN_WIDTH, SCREEN_HEIGHT, &Wire, OLED_RESET);
SoftwareSerial mySerial(2, 3);
Adafruit_Fingerprint finger = Adafruit_Fingerprint(&mySerial);
Servo servo;
void setup() {
Serial.begin(9600);
servo.attach(9);
if (!display.begin(SSD1306_SWITCHCAPVCC, 0x3C)) {
Serial.println(“SSD1306 allocation failed”);
while (true);
}
display.clearDisplay();
display.setCursor(0, 0);
display.println(“Fingerprint Access”);
display.display();
pinMode(4, OUTPUT);
pinMode(5, OUTPUT);
finger.begin(57600);
if (!finger.verifyPassword()) {
Serial.println(“Fingerprint sensor not found”);
while (true);
}
Serial.println(“Sensor ready”);
}
void loop() {
int result = getFingerprintID();
digitalWrite(4, LOW);
display.clearDisplay();
display.setCursor(0, 0);
if (result == 1) {
display.println(“Access Granted”);
servo.write(90);
delay(3000);
servo.write(0);
} else {
display.println(“Access Denied”);
}
display.display();
delay(3000);
}
int getFingerprintID() {
uint8_t p = finger.getImage();
if (p != FINGERPRINT_OK) return -1;
p = finger.image2Tz();
if (p != FINGERPRINT_OK) return -1;
p = finger.fingerFastSearch();
if (p != FINGERPRINT_OK) return 0;
return 1;
}
For the complete source code, visit: GitHub Repository

Conclusion
This project demonstrates the integration of an optical fingerprint sensor with an Arduino Nano to create a reliable access control system. By following this step-by-step guide, you can effectively implement biometric authentication for enhanced security. This setup can be further expanded for various applications, including securing doors, safes, or any restricted areas, making biometric security a practical and efficient solution.