
Bluetooth Controlled RC Car with Velocity Control and Distance Measurement: A Step-by-Step Guide
Creating a Bluetooth-controlled RC car is an exciting and educational project that combines both electronics and programming skills. If you’re a beginner, the process might seem daunting, but with the help of Arduino, it’s easy to get started. In this guide, we will take things a step further by not only controlling the car via Bluetooth but also incorporating velocity control and distance measurement using basic kinematics principles.
At Regent Electronics, we offer all the components you need to build your own Bluetooth-controlled RC car, including microcontrollers, motors, Bluetooth modules, and more.
Step 1: Gather the Necessary Components
Before starting, ensure you have all the components required for the project. Here’s what you need:
- Microcontroller (Arduino Uno): For beginners, we recommend using an Arduino Uno. It’s easy to program and has sufficient GPIO pins for this project. Buy Arduino Uno here.
- Motors and Encoders: We’re using 150 RPM side-shaft geared motors with built-in encoders to track wheel rotations. If you can’t find these motors, you can use dual-shaft BO motors and purchase encoders separately. Buy motors and encoders here.
- Motor Driver (L298N): To run the motors, a motor driver is essential. Arduino cannot supply enough current on its own. Buy L298N motor driver here.
- Chassis and Tires: Select a chassis that fits your motors. You can purchase chassis kits or create a custom one. Buy chassis here.
- Bluetooth Module (HC-05): To connect your Arduino to your smartphone via Bluetooth. Buy HC-05 Bluetooth module here.
- Jumper Wires: You’ll need jumper wires to make all the necessary connections. Buy jumper wires here.
- Battery (12V LiPo or 9V): We’re using a 12V LiPo battery for this project, but you can also use a 9V battery depending on your motor specifications. Be sure to check your motor’s voltage rating before purchasing a battery. Buy 9V battery here.
- Breadboard/Prototyping Board: For easy connections between components. Buy breadboard here.
Step 2: Set Up the Chassis

If you’re using a pre-built chassis, this step is simple. However, if you’re creating your own, choose a lightweight material such as acrylic sheets. Mount the motors securely and add a caster wheel to support the car.
Step 3: Wiring the Motor Driver


To power the motors, we need to set up the motor driver (L298N):
- Connect the positive and negative terminals of the motors to the motor driver.
- Connect the 12V and GND pins from the battery to the motor driver’s corresponding ports.
- Connect the input pins from the motor driver to the PWM pins on the Arduino (e.g., pins 9 and 10).
- For convenience, add a switch between the battery and the motor driver to control power without having to disconnect the battery.
- Connect the 5V and GND from the motor driver to the breadboard to power the Arduino and other components.
Step 4: Set Up the Encoders
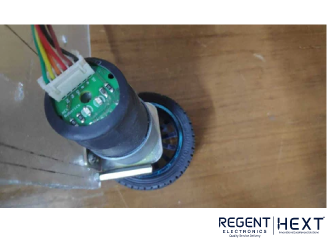
Encoders are used to measure the rotations of the wheels, allowing us to calculate the velocity and distance traveled by the car:
- Connect the M1 and M2 pins to the motor driver.
- Power the encoders by connecting 5V and GND from the breadboard.
- Connect the A and B output pins from the encoders to pins 2 and 3 on the Arduino, which are designated for interrupts.
Step 5: Wiring the Arduino and Bluetooth Module


- Power the Arduino by connecting the 5V and GND pins from the breadboard.
- Connect the HC-05 Bluetooth module to the Arduino: The TX pin of the Bluetooth module goes to pin 0 on the Arduino (RX), and the RX pin of the Bluetooth module goes to pin 1 (TX).
- Note: When uploading code to the Arduino, disconnect the TX pin, as the Arduino can only handle one serial communication at a time. Alternatively, you can use the SoftwareSerial library.
- Connect the encoder output pins to pins 2 and 3 on the Arduino.
Step 6: Mounting the Electronics on the Bot

To ensure your electronics stay in place, you can either screw the components to the chassis or use hot glue to secure everything in position. Proper mounting is crucial to prevent the electronics from moving as the bot drives around.
Step 7: Create an App to Control the Car
To control the car from your smartphone, we will use MIT App Inventor, a user-friendly platform for building Android apps. You don’t need to be an experienced developer to create the app—MIT App Inventor makes it simple and intuitive. Here’s how you can create your own app to control the car:
- Design the App’s Interface: Use buttons or sliders to control the car’s movement, speed, and direction.
- Set Up the Bluetooth Communication: Link the buttons on the app to Bluetooth commands that will be sent to the Arduino to control the car.
- Write the Code: Program the app to send the correct signals (forward, backward, left, right, stop) to the Arduino based on user input.
- Upload the App: Once your app is ready, install it on your smartphone and connect it to the Arduino via Bluetooth.
Conclusion
Building a Bluetooth-controlled RC car with velocity control and distance measurement is a fun and educational project that helps you apply your knowledge of electronics and programming. By incorporating components like the L298N motor driver, HC-05 Bluetooth module, and encoders, you can create a fully functional bot that can measure speed and calculate distance based on wheel rotations.
At Regent Electronics, we provide all the necessary parts to bring your RC car project to life. Whether you’re a beginner or a more experienced hobbyist, this project is an excellent way to learn and expand your skills. Start building your Bluetooth-controlled RC car today!