
Everything You Need to Know About the 4-in-1 Robot Car by Regent Electronics
At Regent Electronics, we’re excited to introduce our 4-in-1 Robot Car, a versatile robot that offers four different modes: Bluetooth-controlled, obstacle avoidance, line following, and edge detection. Pre-programmed on a microprocessor-based development kit, this robot is perfect for beginners and hobbyists alike. With simple connections and easy app configuration, you can quickly get started on your robotics journey.
1. Bluetooth Controlled Robot Car
The Bluetooth-controlled mode allows you to operate your robot car using an intuitive app. Control the car’s direction and movement with ease—move it in all four directions (forward, backward, left, and right) and stop it with a single button press, all through Bluetooth connectivity. This mode offers a straightforward way to maneuver your robot using a smartphone or tablet.
2. Obstacle Avoiding Robot Car
In the obstacle avoidance mode, the robot detects obstacles in its path using sensors and autonomously alters its direction to avoid collisions. This intelligent behavior helps the robot navigate various environments smoothly, making it an excellent feature for autonomous exploration.
3. Line Following Robot
In line following mode, the robot follows a pre-defined path using IR sensors to track a black line on a white surface. The black tape serves as the guiding track, allowing the robot to move along the path accurately. It’s an ideal mode for projects involving automated navigation along predetermined routes.
4. Edge Detection Robot
The edge detection mode prevents the robot from falling off elevated surfaces. By detecting the edge of a platform, the robot stops before it drops, ensuring safety and preventing accidents. Calibration with a contrasting surface (like a white chart paper) is required for optimal performance.
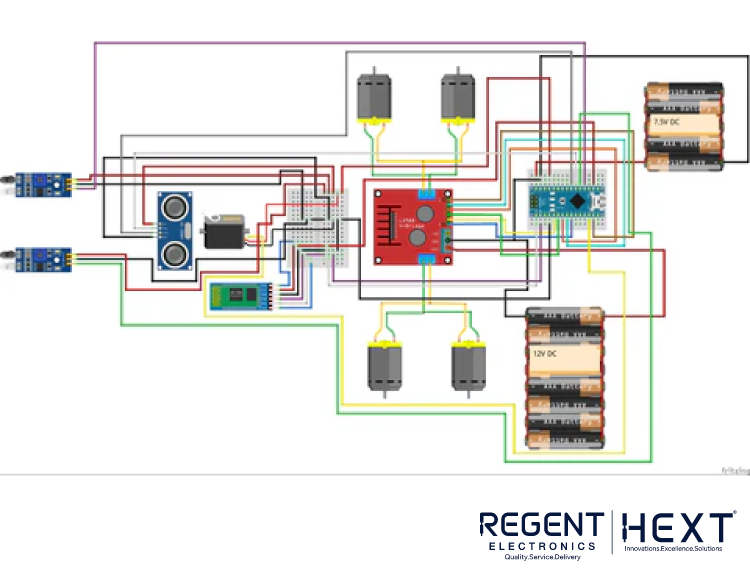
Connections for Setting Up Your 4-in-1 Robot Car
Proper wiring is essential for making the most out of your 4-in-1 robot. Here’s how to connect the various components:
- 12V Motor Power: Connect the positive terminal of the 12V battery pack to the L298N motor driver and the negative terminal to the motor driver’s GND.
- Arduino Power: Power the Arduino NANO with a 7.5V battery pack. Connect the positive terminal to the Vin pin and the negative terminal to GND on the Arduino.
- Motor Connections: Attach the motor terminals to the output pins of the motor driver as shown in the circuit diagram.
- Control Pins: Connect the control pins (ENA, IN1, IN2, IN3, IN4, ENB) to the appropriate digital pins on the Arduino for motor control.
- Bluetooth Module: Connect the TX and RX pins of the HC05 Bluetooth module to the corresponding RX and TX pins of the Arduino.
- Servo Motor for Ultrasonic Sensor: Mount the ultrasonic sensor on a servo motor to enable precise distance measurement and obstacle detection.
How to Calibrate the IR Sensors
Calibration of the IR sensors is crucial for ensuring your robot operates correctly in line following and edge detection modes:
For Line Following Robot Mode:
- Place the robot on the white chart paper.
- Adjust the potentiometer on the IR sensor until both LEDs light up when the sensor is on the white surface.
- Ensure that only one LED lights up when the sensor is over the black tape.
- Repeat the same process for the second sensor.
For Edge Detection Robot Mode:
- Place a white chart paper on the table to ensure a clear contrast between the surface and the edges.
- Adjust the IR sensor’s potentiometer so that both LEDs light up when the sensor is on the white surface and only one LED lights up when at the edge.
How to Configure the Mobile App


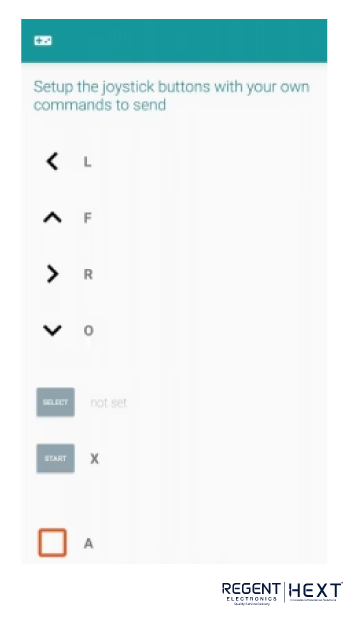
- Download the App: Install the Bluetooth control app and pair it with the HC05 Bluetooth module. Use the default password “0000” or “1234” to connect.
- App Setup:
- Open the app and connect it to the HC05 module.
- Select controller mode to drive the robot in different modes.
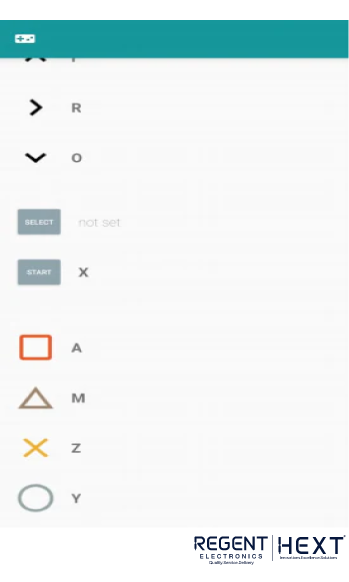
- Assign Commands:
- Configure the app’s control buttons by assigning specific commands. For example, set the triangle button to “M” (for movement), the square button for obstacle avoidance, the circle button for edge detection, and the X button for line following.
- Control Modes:
- Manual Mode: Use the directional arrows to control the robot’s movement.
- Obstacle Avoidance Mode: Press the square button for automatic navigation. The robot will detect obstacles and adjust its path.
- Line Following Mode: After calibration, press the X button to follow the path created by the black tape.
- Edge Detection Mode: Press the circle button to activate edge detection. The robot will stop near the edge to prevent falling off.
Conclusion
The 4-in-1 Robot Car from Regent Electronics offers four exciting modes for both beginners and advanced robotics enthusiasts. Whether you’re controlling it via Bluetooth, setting up obstacle avoidance, following a line, or detecting edges, this robot provides endless opportunities for learning and experimentation. With easy setup instructions and simple calibration, it’s the perfect tool for anyone looking to explore the world of robotics.
Visit Regent Electronics today to get your own 4-in-1 robot car and start experimenting with these fascinating robotic modes!