
Build Your Own Easy Radiation Detector Using a Geiger Counter Module
Introduction
Radiation detectors are essential instruments for identifying high-energy particles generated by nuclear decay, cosmic radiation, or x-ray scans. These detectors, commonly known as Geiger counters, play a crucial role in radiation detection and measurement.
In this guide, we will walk you through the process of building a simple yet effective radiation detector using an Arduino Uno and a Geiger counter module.
What is Radiation?
Radiation is the emission or transmission of energy in waves or particle form. It is categorized into ionizing and non-ionizing radiation based on energy levels and sources.
For this project, we will focus on ionizing radiation, which includes:
- Electromagnetic radiation: UV, X-ray, Gamma rays (γ).
- Particle radiation: Alpha (α), Beta (β), Proton, and Neutron radiation.
How is Radiation Detected?
Early methods of radiation detection included photographic plates and cloud chambers. Modern radiation detectors utilize electronic systems that measure radiation intensity and characteristics, such as spin, charge, and trajectory.
Types of Radiation Detectors
Gaseous Ionization Detectors
These instruments measure ionizing radiation by detecting the ionization of gas molecules within a chamber.
Geiger Counter
The Geiger-Müller counter, or Geiger counter, is one of the most commonly used radiation detectors. It consists of a gas-filled tube with a high-voltage central wire that detects ionization caused by incident radiation.
Types of Ionizing Radiation
- Alpha Radiation (α): High-energy helium nuclei with low penetration depth.
- Beta Radiation (β): Fast-moving electrons with moderate penetration capability.
- Gamma Radiation (γ): High-energy photons with deep penetration.
What is Arduino Uno?
Arduino Uno is a microcontroller board based on the ATmega328P. It includes:
- 14 digital I/O pins
- 6 analog inputs
- 16 MHz ceramic resonator
- USB connection
- Power jack
- Reset button
Arduino Uno provides an easy-to-use platform for electronics prototyping and automation projects.
Hardware Requirements
To build your radiation detector, you will need:
- Arduino Uno
- DFRobot Geiger Counter Module
- 1602 LCD Display with I2C module
- Jumper Cables
Software Requirements
- Arduino IDE
- DFRobot Geiger Counter Module Library
Prerequisites and Setup
- Download and install the Arduino IDE.
- Install the required libraries.
- Connect the Arduino Uno to your PC.
- Ensure the correct COM port is selected.
Circuit Diagram & Hardware Interfacing
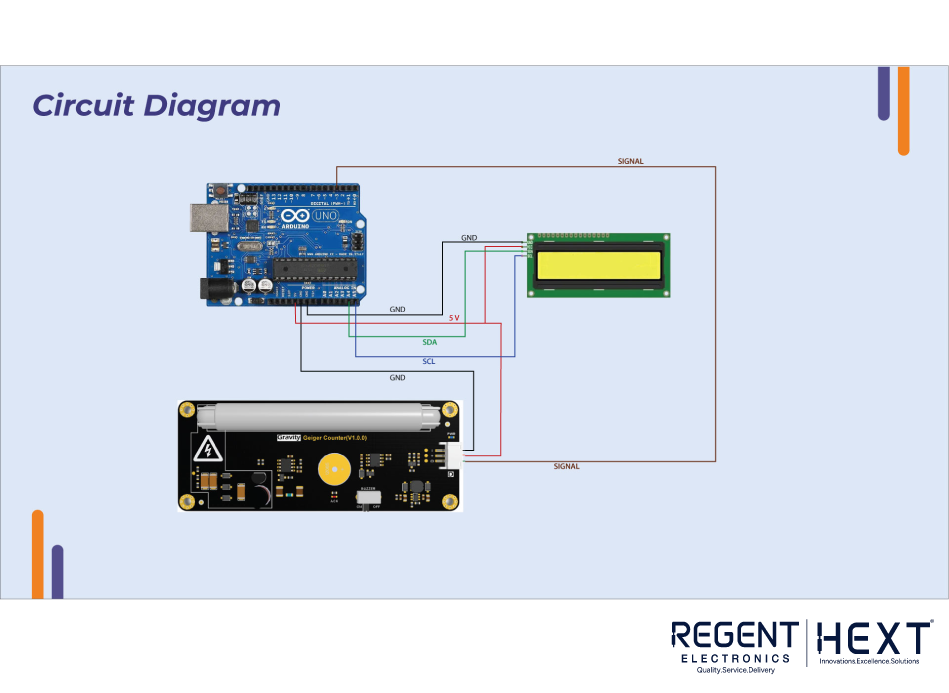
Connections:
- Arduino Uno to DFRobot Geiger Counter Module
- +5V → +Ve
- GND → -Ve
- Pin 3 → Signal
- Arduino Uno to 1602 LCD Display
- +5V → +Ve
- GND → -Ve
- A4 → SDA
- A5 → SCL
Coding
Upload the following code using the Arduino IDE:
#include <Wire.h>
#include <LiquidCrystal_I2C.h>
#include <DFRobot_Geiger.h>
#if defined ESP32
#define detect_pin D3
#else
#define detect_pin 3
#endif
LiquidCrystal_I2C lcd(0x27,16, 2);
DFRobot_Geiger geiger(detect_pin);
void setup(){
Serial.begin(9600);
lcd.init();
lcd.backlight();
geiger.start();
}
void loop(){
lcd.clear();
float x = geiger.getCPM();
Serial.println(x);
lcd.setCursor(0,0);
lcd.print(“CPM :”);
lcd.setCursor(0,1);
lcd.print(x);
delay(3000);
}
Working Principle
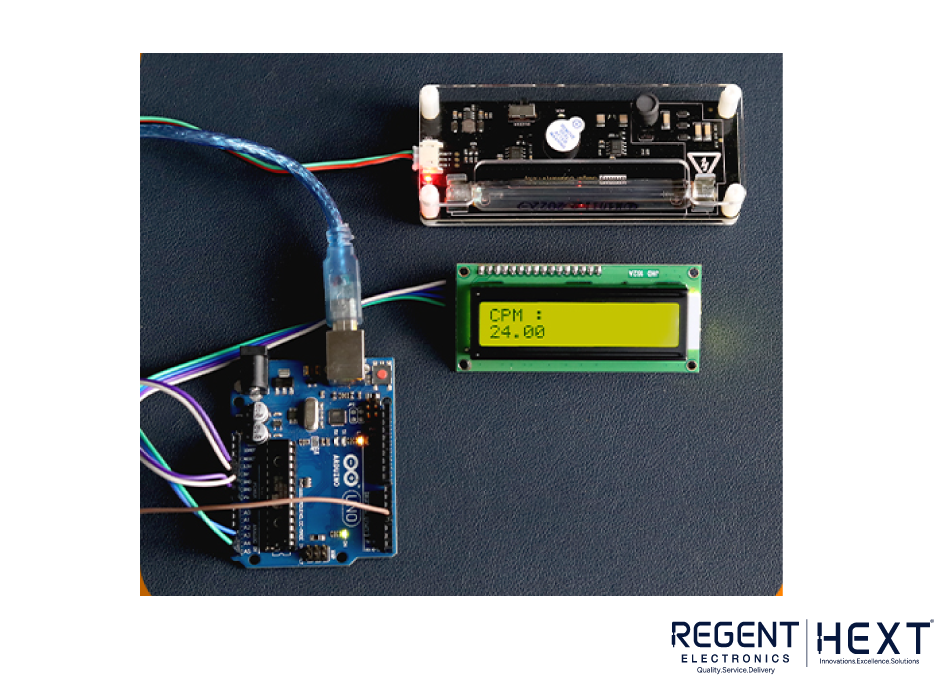
- The Geiger counter module charges its tube to 400V.
- When ionizing radiation passes through the tube, it collides with gas molecules, creating ion pairs.
- A stray electron is attracted to the wire in the center, generating an electrical pulse.
- The IC on the module picks up this signal and transmits it to the Arduino Uno.
- The Arduino processes the data and displays the radiation levels on the LCD screen.
Conclusion
Congratulations! You have successfully built a simple Geiger counter using Arduino Uno. However, please note that this DIY project is for educational purposes only and should not be used as a replacement for certified radiation detection equipment. Avoid exposure to radioactive materials, as they can have serious health consequences.
By following this guide, you can further explore radiation detection applications and enhance your understanding of Arduino-based projects.