

Complete Guide to Arduino Pin Configuration – Updated for 2025
Understanding the pin configuration of your Arduino board is essential before starting any project. Whether you’re a beginner or an advanced user, knowing how to use each pin effectively will help you successfully create your Arduino-based projects. This guide will walk you through the pin configuration of various Arduino models, including the popular Arduino Uno, Mega, Nano, Leonardo, Due, LilyPad, Micro, and Pro Mini, all available at Regent Electronics.
Models Covered:
- Arduino Uno (R3)
- Arduino Mega (R3)
- Arduino Nano
- Arduino Leonardo
- Arduino Due
- LilyPad Arduino
- Arduino Micro
- Arduino Pro Mini
1. Arduino Uno (R3) Pin Configuration
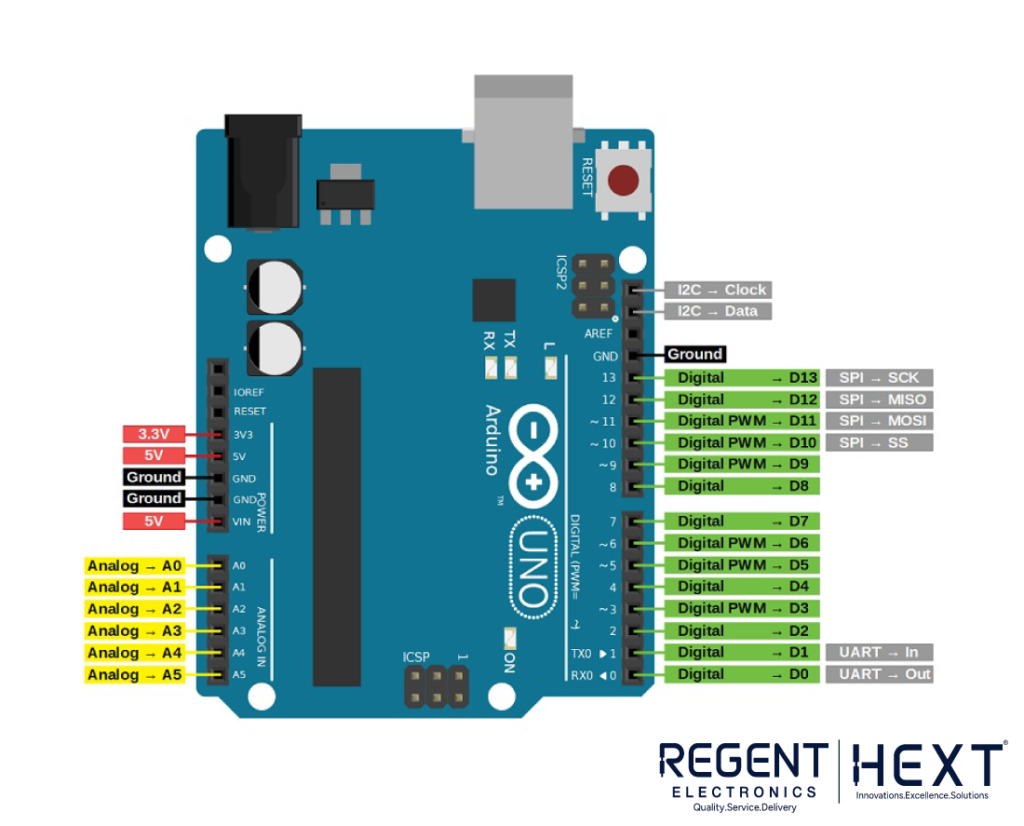
The Arduino Uno is one of the most popular and beginner-friendly boards in the Arduino family. It’s an excellent choice for new makers and developers.
- Vin: Input voltage pin (external power supply).
- 5V: Regulated 5V power supply for the board and connected components.
- 3.3V: 3.3V supply generated from a voltage regulator.
- GND: Ground pin.
- Reset: Resets the microcontroller.
- Analog Pins (A0 – A5): Used for analog input (0-5V range).
- Digital Pins (0 – 13): Digital I/O pins for input or output.
- Serial Pins (TX/RX): Used for communication with other devices (e.g., computers).
- External Interrupt Pins (Pins 2 and 3): Trigger external interrupts.
- PWM Pins: Pins 3, 5, 6, 9, 10, and 11 are used for PWM output (pulse-width modulation).
- SPI Pins: Includes pins for Serial Peripheral Interface communication (MOSI, MISO, SCK, SS).
- LED Pin: Onboard LED connected to pin 13, lit when the pin is HIGH.
- AREF Pin: Analog reference voltage pin.
2. Arduino Mega (R3) Pin Configuration
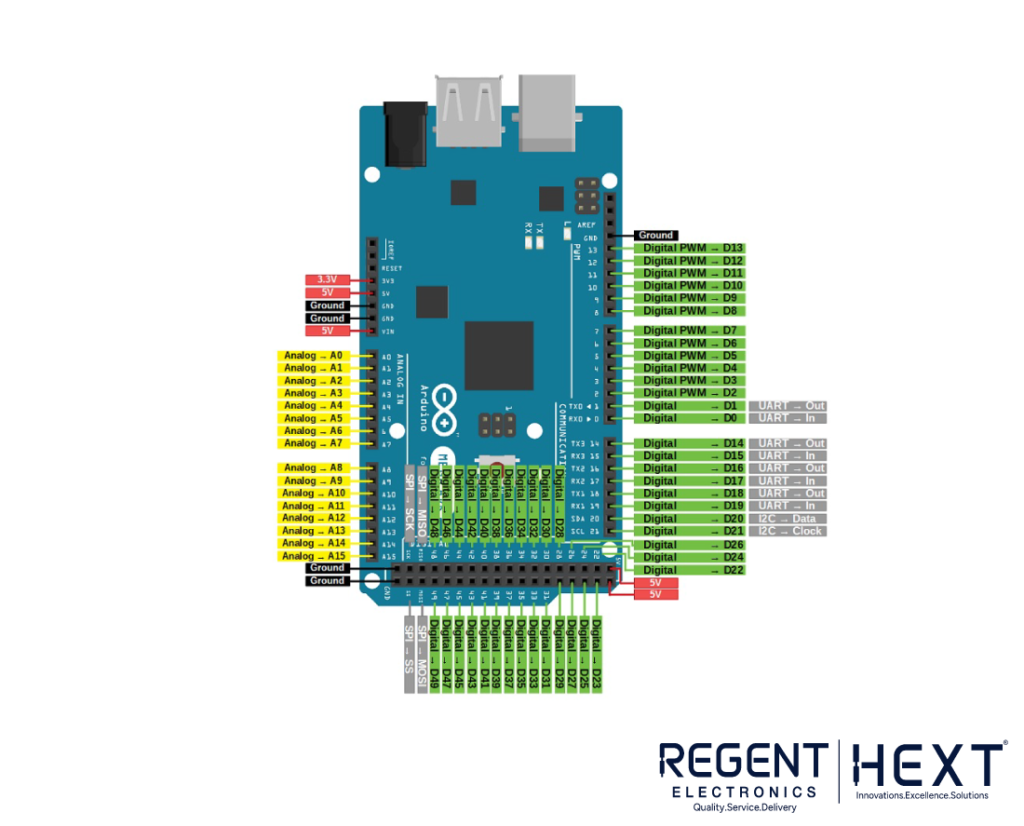
The Arduino Mega offers more I/O pins than the Uno, making it a great choice for advanced projects that require multiple sensors or outputs.
- Vin, 5V, 3.3V, GND, Reset: Similar to the Uno board.
- Analog Pins (A0 – A15): 16 analog input pins, with the ability to be used as digital I/O pins.
- Serial Pins (0 – 3): Four serial communication ports.
- External Interrupt Pins: Available on pins 0, 3, 21, 20, 19, and 18.
- I2C: Pins 20 (SDA) and 21 (SCL) for I2C communication.
- SPI Pins: MISO (50), MOSI (51), SCK (52), SS (53).
- LED Pin: Built-in LED on pin 13.
3. Arduino Nano Pin Configuration
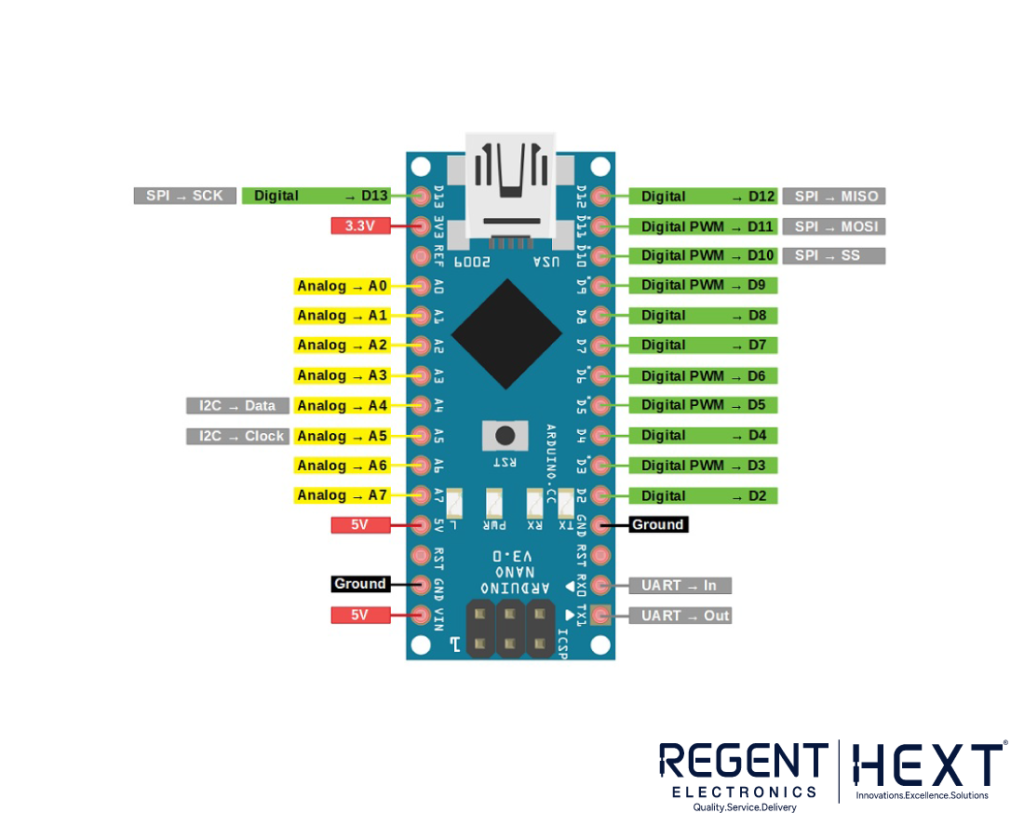
The Arduino Nano is a smaller, more compact version of the Uno, ideal for breadboard projects and portable applications.
- Vin, 5V, 3.3V, GND, Reset: Same as the Uno.
- Analog Pins (A0 – A7): 8 analog input pins.
- Digital Pins (D0 – D13): 14 digital I/O pins.
- Serial Pins (TX/RX): For UART communication.
- PWM Pins: Pins 3, 5, 6, 9, 10, 11 for PWM output.
- SPI Pins: SS (10), MOSI (11), MISO (12), SCK (13).
- I2C: Pins A4 (SDA) and A5 (SCL).
- LED Pin: Built-in LED on pin 13.
4. Arduino Leonardo Pin Configuration
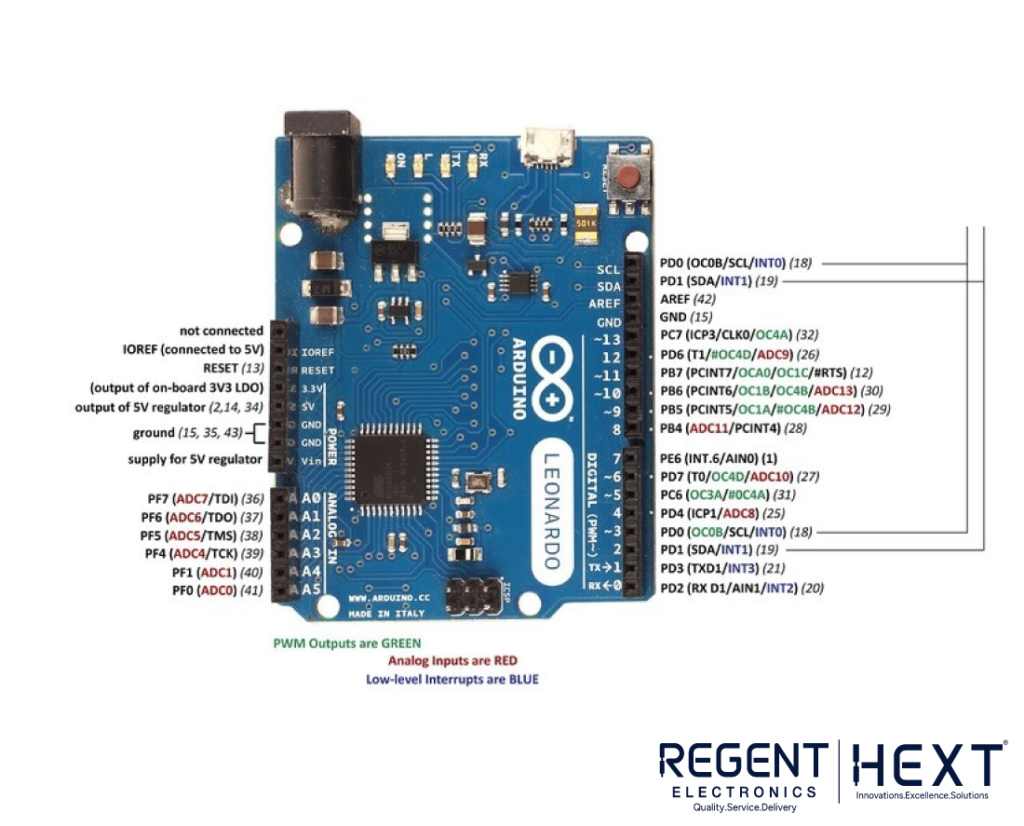
The Arduino Leonardo offers more pins than the Uno and includes a USB connection for easier communication with a computer.
- Vin, 5V, 3.3V, GND, Reset: Similar to other boards.
- Analog Pins (A0 – A11): 12 analog input pins.
- Digital Pins (4, 6, 8, 9, 10, 12): Digital I/O pins.
- Serial Pins: TX/RX for communication.
- External Interrupt Pins: Pins 2 and 3.
- I2C: Pins 2 (SDA) and 3 (SCL).
- LED Pin: Onboard LED connected to pin 13.
5. Arduino Due Pin Configuration
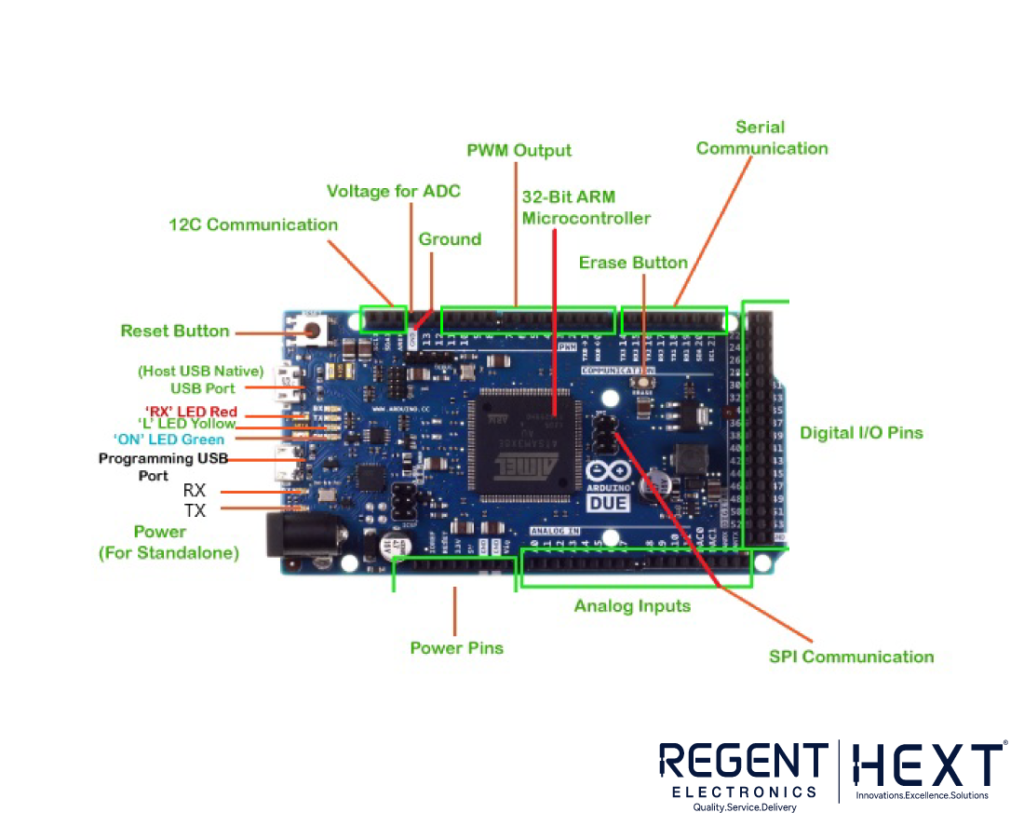
The Arduino Due is designed for more complex and larger scale projects, supporting more PWM and ADC outputs.
- Vin, 5V, 3.3V, GND, Reset: Same as the Uno.
- IOREF: Input-output reference voltage for compatibility with various shields.
- Analog Pins (A0 – A11): 12 analog input pins.
- Digital Pins (0 – 53): Full set of digital I/O pins.
- PWM Pins: Pins 2 – 13 support PWM.
- SPI Pins: Standard SPI communication pins.
- I2C: SDA and SCL pins for I2C communication.
- Voltage for ADC: Maps voltage to integer values (0 to 1023).
- Erase Button: Erases the flash memory.
6. LilyPad Arduino Pin Configuration
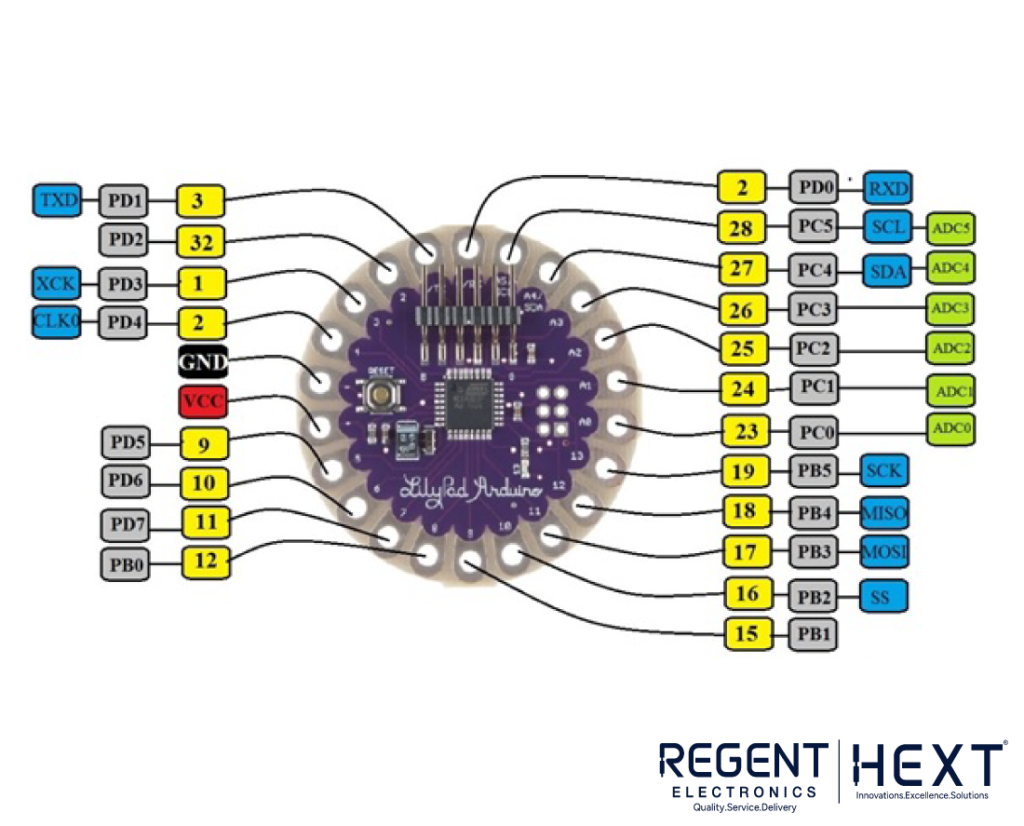
The LilyPad Arduino is designed for wearable electronics, with a unique circular shape and sewable connections.
- VCC: Provides 5V or 3.3V power to the board.
- GND: Ground pin.
- Reset: Resets the microcontroller.
- Analog Pins (A0 – A5): Analog input pins.
- Digital Pins (0 – 13): Digital I/O pins.
- PWM Pins: Pins 9, 10, 15, 16, and 17.
- SPI Pins: Used for serial communication.
- I2C: SDA and SCL pins for communication.
7. Arduino Micro Pin Configuration

The Arduino Micro is a compact version of the Leonardo, offering a similar feature set in a smaller form factor.
- Vin, 5V, 3.3V, GND, Reset: Power and reset pins.
- Analog Pins (A0 – A11): 12 analog input pins.
- Digital Pins (4, 6, 8, 9, 10, 12): Digital I/O pins.
- PWM Pins: Pins 3, 5, 6, 9, 10, 11, 13.
- Serial Pins: UART communication pins.
- I2C: SDA and SCL pins for communication.
- SPI Pins: Used for SPI communication.
8. Arduino Pro Mini Pin Configuration
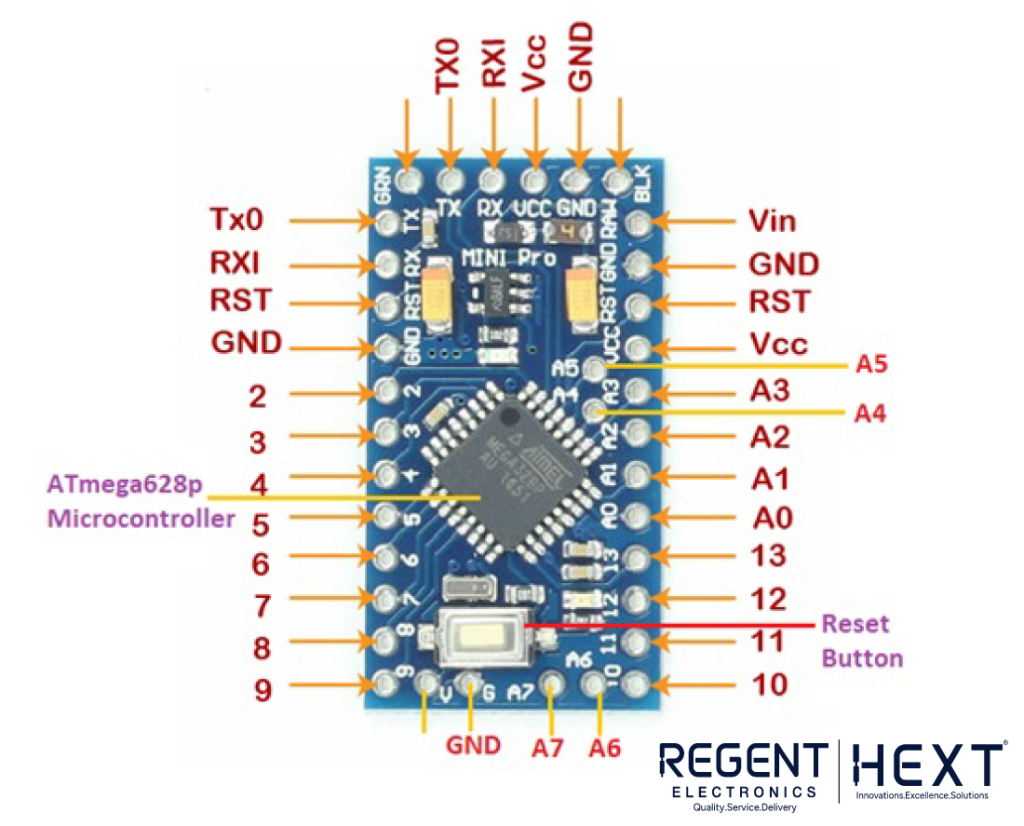
The Arduino Pro Mini is a tiny and efficient board for advanced users. It offers a RAW pin for more flexibility.
- Vin, VCC, GND, Reset: Power and reset configuration.
- Analog Pins (A0 – A7): 8 analog input pins.
- Digital Pins (2 – 13): Digital I/O pins.
- External Interrupt Pins: Pins 4 and 5.
- PWM Pins: Pins 3, 5, 6, 9, 10, 12.
- SPI Pins: MISO, MOSI, SCK, and SS for SPI communication.
- Analog Comparator: Pins AIN0 and AIN1 for analog comparison.
Conclusion
Now that you’ve learned about the pin configurations for various Arduino boards, you can confidently choose the right board for your project at Regent Electronics. Whether you need more I/O pins, a smaller form factor, or advanced features, there’s an Arduino board suited for your needs. Happy building, and don’t forget to explore the wide range of Arduino-related products available at Regent Electronics!
By understanding the pinout and capabilities of each board, you’re ready to start experimenting with different sensors, actuators, and creative electronics projects.