

GUI Designing on Raspberry Pi Using Tkinter and Python
Introduction
Welcome to an exciting journey of designing your own GUI on Raspberry Pi using Tkinter and Python! If you are looking to develop an application for automation, this step-by-step guide will help you build a GUI from scratch. In this blog, we will explore the Tkinter library and how it helps in creating an interactive graphical user interface on Raspberry Pi.
By the end of this tutorial, you will be able to design a GUI application for Raspberry Pi, control GPIO pins, and build custom applications.
Understanding Tkinter for GUI Development
What is Tkinter and Why Use it on Raspberry Pi?
Tkinter is a built-in Python library that provides tools for developing GUI applications. Since Python is a widely used programming language that includes several useful libraries, Tkinter is readily available and requires no additional installation.
Tkinter offers a variety of classes and methods that make it easy to create widgets like buttons, labels, frames, and input fields.
If you have any questions about Tkinter, feel free to drop them in the comments section below!
Creating a Simple Greeting GUI Application with Tkinter
The following code demonstrates how to create a simple greeting app using Tkinter. You can copy and execute it on any Python IDE of your choice:
from tkinter import ttk
import tkinter as tk
app_main_window = tk.Tk()
def greet():
print(f”Hello {submit_label_Entry_text.get()}!!”)
submit_button_text = tk.StringVar()
submit_label_Entry_text = tk.StringVar()
submit_button_text.set(“Submit”)
s = ttk.Style()
s.configure(‘.’, background=’gray’)
main_frame = ttk.Frame(app_main_window, style=’main_frame.TFrame’, height=100, width=50, cursor=’question_arrow’, relief=’sunken’)
main_frame.pack(fill=’x’)
hi_label = ttk.Label(main_frame, text=’Enter Your Name: ‘)
submit_button = ttk.Button(main_frame, text=’Submit Button’, style=’submit_button.TButton’, textvariable=submit_button_text, width=25, command=greet)
user_entry = ttk.Entry(main_frame, textvariable=submit_label_Entry_text)
hi_label.grid(row=0, column=0)
user_entry.grid(row=0, column=1)
submit_button.grid(row=2, columnspan=3, pady=5)
app_main_window.mainloop()
How This Code Works
This program creates a simple GUI with an input field where users can enter their names. When they click the submit button, it prints a greeting message in the console.
Tkinter Widgets and Styling with ttk
Difference Between tk and ttk
Tkinter’s ttk module enhances the look and feel of GUI applications by offering modern styling options. Using ttk provides more customization options for widgets.
Creating Frames in Tkinter
Frames act as containers to organize other widgets in the GUI application.
Example code for creating a frame:
from tkinter import ttk
import tkinter as tk
app_main_window = tk.Tk()
s = ttk.Style()
s.configure(‘.’, background=’orange’)
main_frame = ttk.Frame(app_main_window, style=’main_frame.TFrame’, height=100, width=50, cursor=’question_arrow’, relief=’sunken’)
main_frame.pack(side=’left’)
app_main_window.mainloop()
Key Options for ttk.Frame
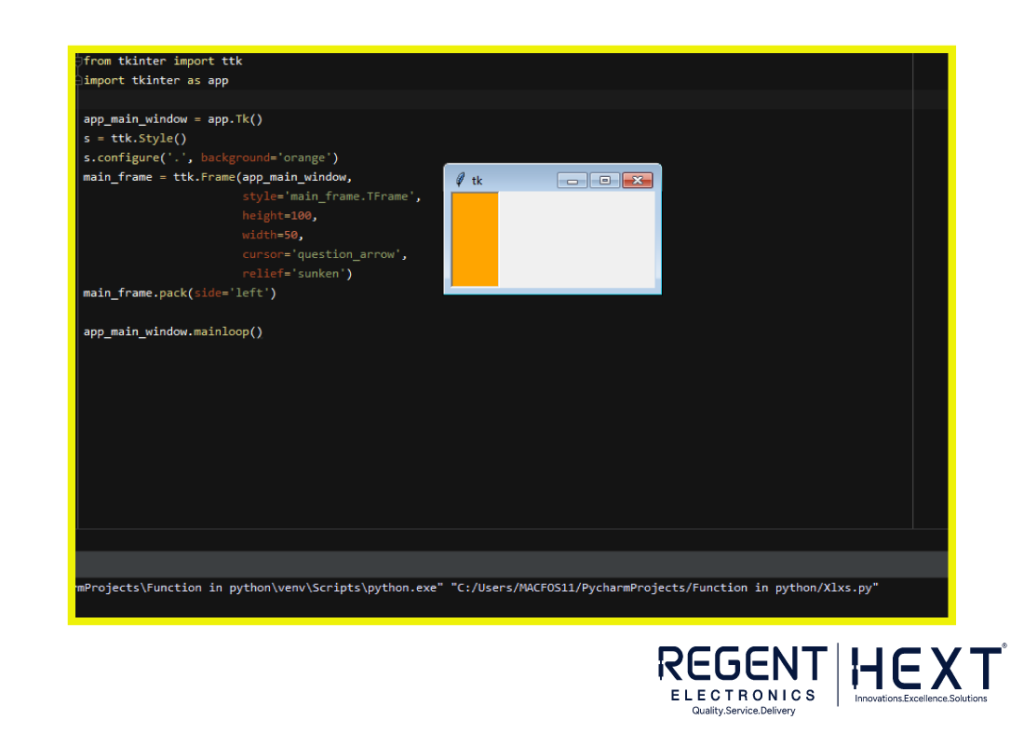
- Background Styling: Use s.configure(‘.’, background=’color’) to change the background color.
- Height and Width: Customize the dimensions of the frame.
- Cursor Style: Modify how the cursor appears when hovering over the frame.
- Relief Options: Change the border style of the frame (e.g., sunken, raised, groove, etc.).
Adding Buttons in Tkinter
Buttons allow users to trigger actions within the GUI.
Example code for creating a button:
from tkinter import ttk
import tkinter as tk
app_main_window = tk.Tk()
submit_button_text = tk.StringVar()
submit_button_text.set(“Submit”)
s = ttk.Style()
s.configure(‘.’, background=’orange’)
submit_button = ttk.Button(
app_main_window,
text=’Submit Button’,
style=’submit_button.TButton’,
textvariable=submit_button_text,
width=20,
command=lambda: submit_button_text.set(‘Clicked!’)
)
submit_button.pack()
app_main_window.mainloop()
Button Customization Options
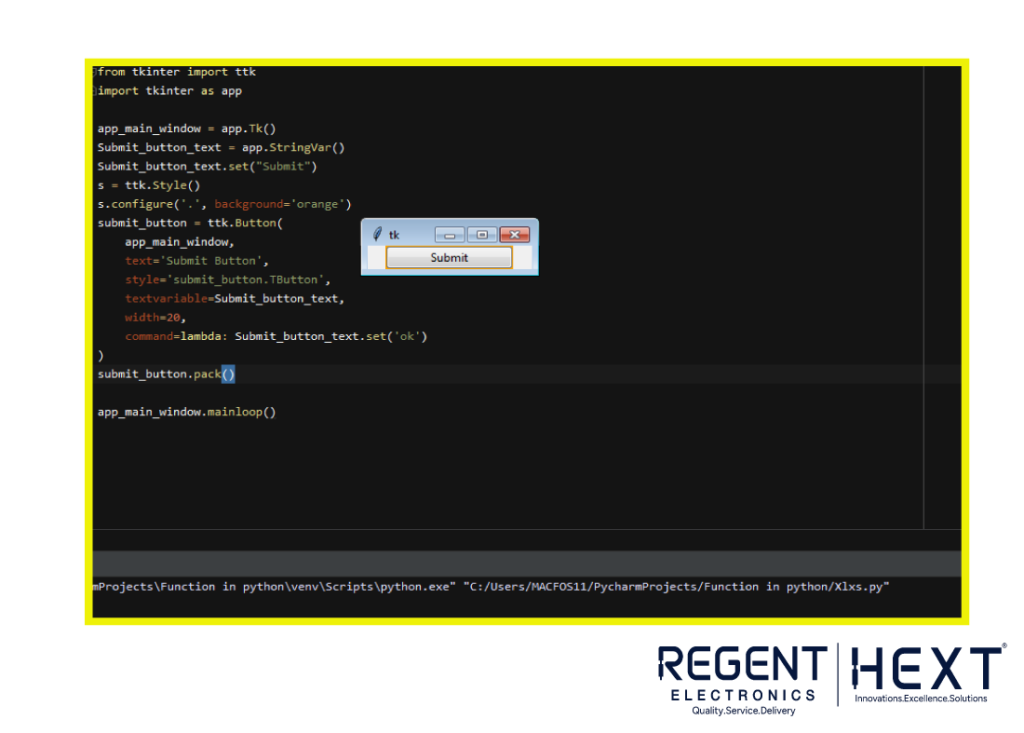
- Text: Assign a fixed name to the button.
- TextVariable: Change button text dynamically.
- Style: Apply styling to the button.
Using Labels in Tkinter
Labels are used to display text in the GUI.
Example code for creating a label:
from tkinter import ttk
import tkinter as tk
app_main_window = tk.Tk()
label_text = tk.StringVar()
label_text.set(“This is a label text”)
s = ttk.Style()
s.configure(‘.’, background=’orange’)
label_widget = ttk.Label(app_main_window, style=’label_widget.TLabel’, textvariable=label_text, width=25)
label_widget.pack()
app_main_window.mainloop()
Label Customization Options
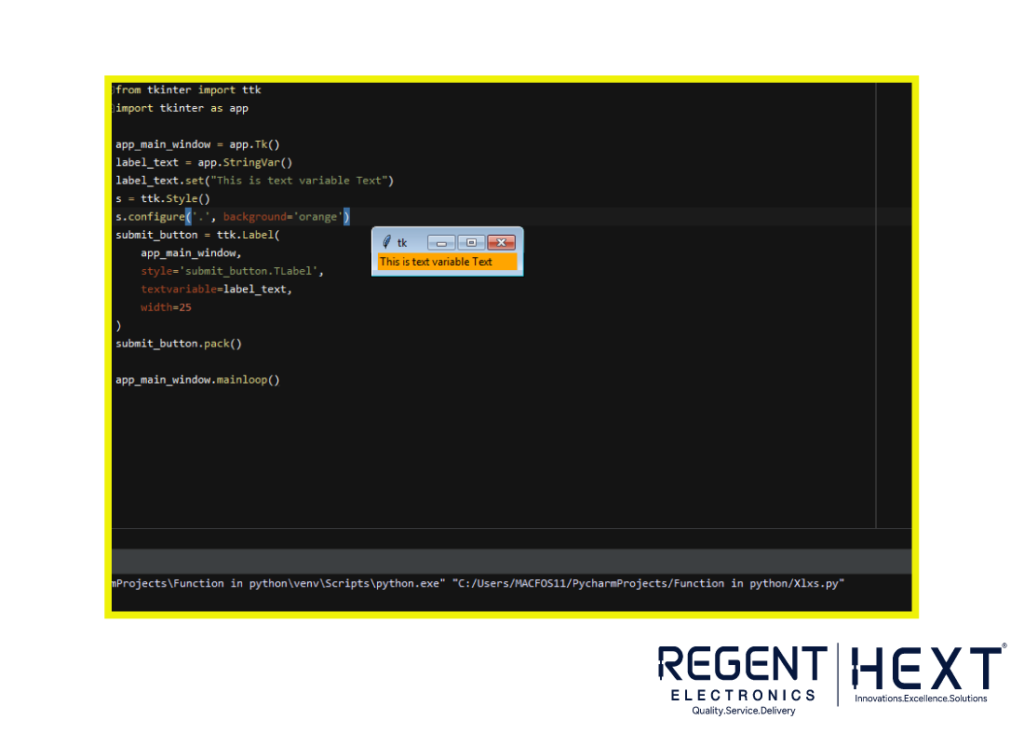
- Text: Static label text.
- TextVariable: Allows dynamic text updates.
- Style: Customize label appearance.
Conclusion
This blog covered the fundamental Tkinter widgets used for GUI designing on Raspberry Pi. We learned how to create frames, buttons, and labels while using the ttk module for styling.
In the next tutorial, we will explore the Geometry Manager and how to efficiently arrange widgets in a GUI application.
Stay tuned and happy coding!