

DIY Bidirectional Visitor Counter – A Simple and Smart Arduino Project
Discover how to create a bidirectional visitor counter using Arduino to manage occupancy and automate devices like lights and fans based on room occupancy. This project is not only fun but also practical, as it can be used in various settings such as shops, salons, banks, and other public spaces to promote social distancing or control electrical appliances efficiently.
Components Needed:
- Arduino Board
- IR Proximity Sensors (x2)
- Breadboard
- Connecting Wires
- Power Supply
- 16×2 LCD Screen
What is an IR Proximity Sensor, and How Does It Work?
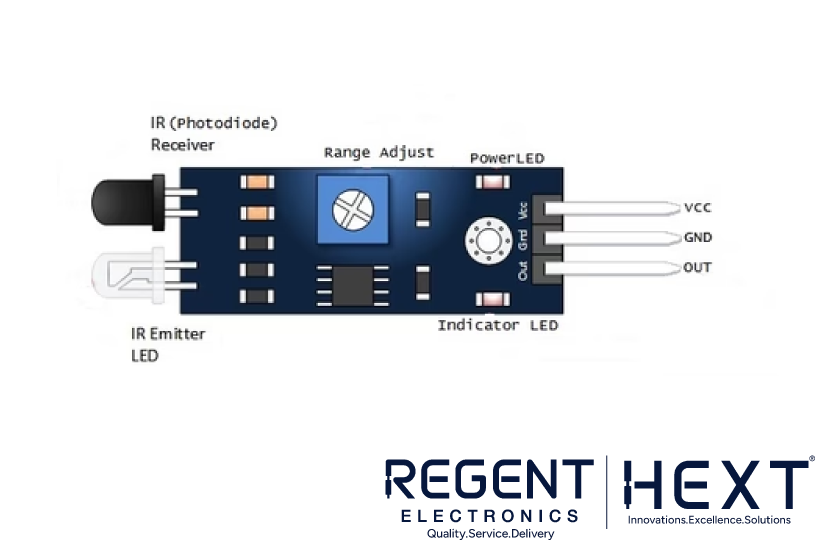
An IR proximity sensor detects nearby objects without physical contact. It works by emitting infrared rays through an IR LED. When these rays encounter an object, they reflect back and are detected by the IR receiver. The amount of reflected light depends on the distance between the object and the sensor.
Key Features:
- Digital or Analog Output: Depending on the type of IR sensor.
- Non-Contact Detection: Perfect for maintaining hygiene in applications.
How to Interface a 16×2 LCD with Arduino Uno
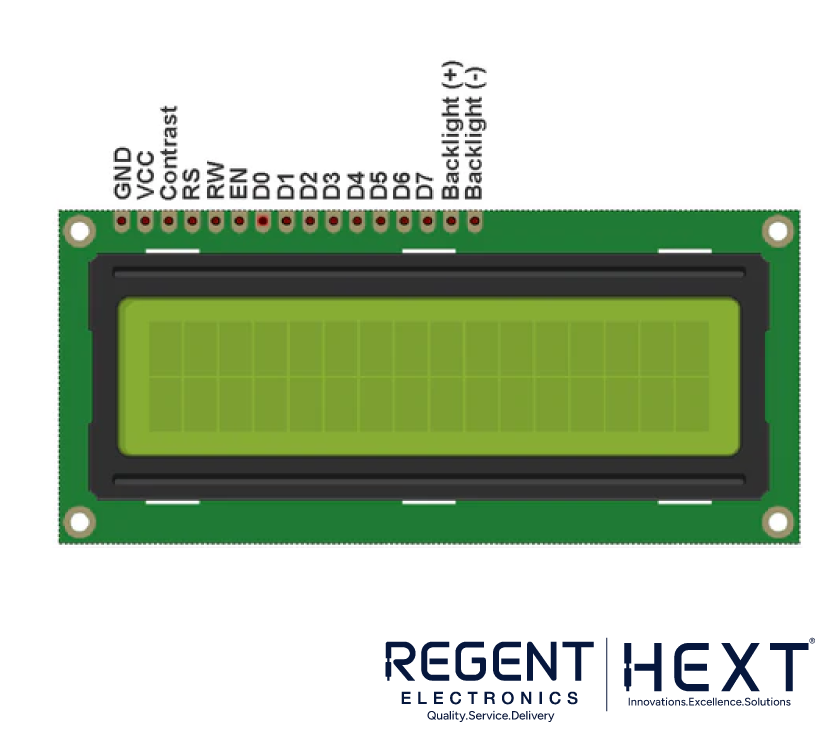
The 16×2 LCD module is widely used in Arduino projects for displaying data. It features 16 pins and operates in two modes:
- 4-bit mode: Uses four data lines.
- 8-bit mode: Uses eight data lines.
For this project, the LCD operates in 4-bit mode to conserve Arduino pins.
Pinout Details:
- Vss (Pin 1): Connect to ground.
- Vcc (Pin 2): Supply 5V power.
- VEE (Pin 3): Adjust contrast using a 10K potentiometer.
- RS (Pin 4): Controls data/command register.
- R/W (Pin 5): Set LOW for write mode.
- E (Pin 6): Enables the module.
- DB0–DB7 (Pins 7–14): Data pins for sending commands or data.
- Backlight Pins (Pins 15 & 16): Control the LCD backlight.
How It Works
The visitor counter uses two IR sensors:
- Entering the room: The first sensor detects movement, followed by the second, increasing the count.
- Exiting the room: The second sensor detects movement before the first, decreasing the count.
The counter value is displayed on the LCD. If the count is greater than zero, the relay turns on, powering devices like lights or fans. When the count returns to zero, the relay switches off.
Circuit Diagram
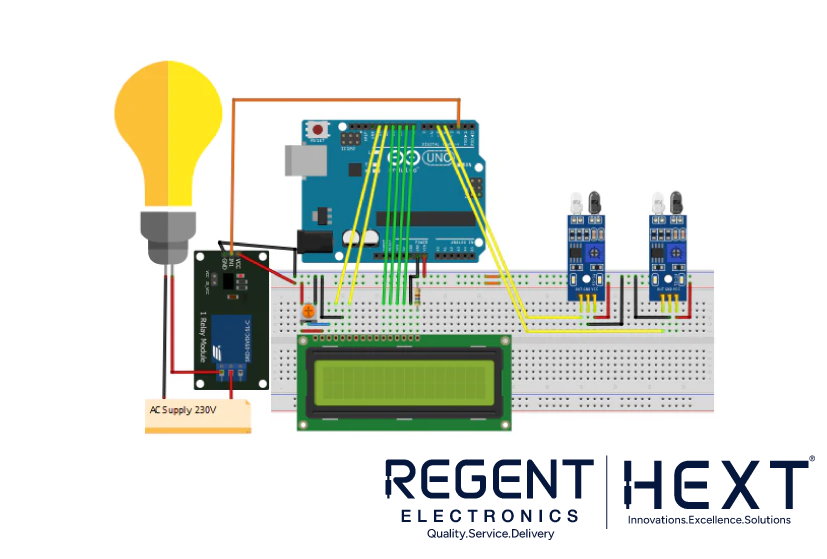
[Insert circuit diagram here, showing the connection between the Arduino, IR sensors, LCD, and relay.]
Arduino Code for Bidirectional Visitor Counter
cpp
CopyEdit
#include <LiquidCrystal.h>
// Initialize the LCD (RS, E, D4, D5, D6, D7)
LiquidCrystal lcd(13, 12, 11, 10, 9, 8);
int In = 4; // Input for the first IR sensor
int Out = 5; // Input for the second IR sensor
int relay = 2; // Relay pin
int count = 0; // Visitor counter
void setup() {
lcd.begin(16, 2);
lcd.print(“Visitor Counter”);
delay(2000);
pinMode(In, INPUT);
pinMode(Out, INPUT);
pinMode(relay, OUTPUT);
lcd.clear();
lcd.print(“Persons in Room:”);
Serial.begin(9600);
}
void loop() {
if (digitalRead(In) == LOW) {
count++;
} else if (digitalRead(Out) == LOW) {
count–;
}
if (count > 0) {
digitalWrite(relay, HIGH); // Turn on the relay
} else {
digitalWrite(relay, LOW); // Turn off the relay
}
lcd.setCursor(0, 1);
lcd.print(count); // Display the count on the LCD
Serial.println(count); // Debug count in Serial Monitor
delay(700);
}
Applications:
- Room Automation: Automate lights and fans based on occupancy.
- Crowd Control: Monitor room capacity for social distancing.
- Security Systems: Keep track of entries and exits.
Get started with this exciting project and explore more Arduino-based innovations at Regent Electronics!