

DIY ESP32-CAM Intruder Photo Capture and Alert System
Welcome to an exciting new tutorial where we guide you through creating a smart and efficient home security system using the ESP32-CAM. This system can monitor your home while you’re away, sending you an alert along with a photo of any intruder. You’ll also learn how to remotely trigger the camera from your smartphone. This project combines the power of IoT and the ESP32-CAM development board to offer an easy, affordable, and customizable security solution.
Components Required
- ESP32-CAM Development Board
- NodeMCU/Arduino Board
- Connecting Wires
- PIR Motion Sensor
- Power Supply
- Breadboard
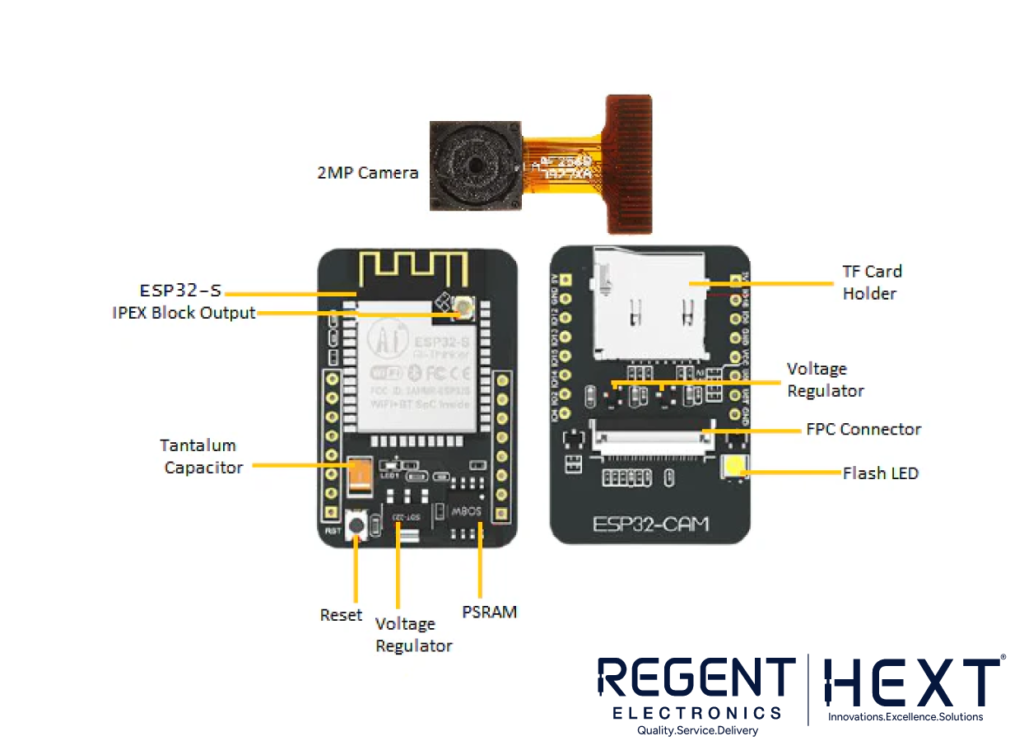
What is the ESP32-CAM Development Board?
The ESP32-CAM is a compact, low-cost camera module that utilizes the ESP32-S microprocessor, making it a perfect choice for IoT projects. It comes with an integrated OV2640 camera and a micro-SD card slot to store captured images. The ESP32-CAM is well-known for its Wi-Fi capabilities and ease of integration with various IoT applications.
Key Features:
- Smallest 802.11b/g/n Wi-Fi module with Bluetooth
- Low-power 32-bit CPU with clock speed up to 160MHz
- Built-in 520KB SRAM, with external 4MB PSRAM
- Supports UART/SPI/I2C/PWM/ADC/DAC
- Camera support for OV2640 and OV7670 with built-in flash
- Micro-SD card support for image storage
- Image upload over Wi-Fi
- Multiple sleep modes for power efficiency
- Smart Config/AirKiss technology for setup
ESP32-CAM Pinout
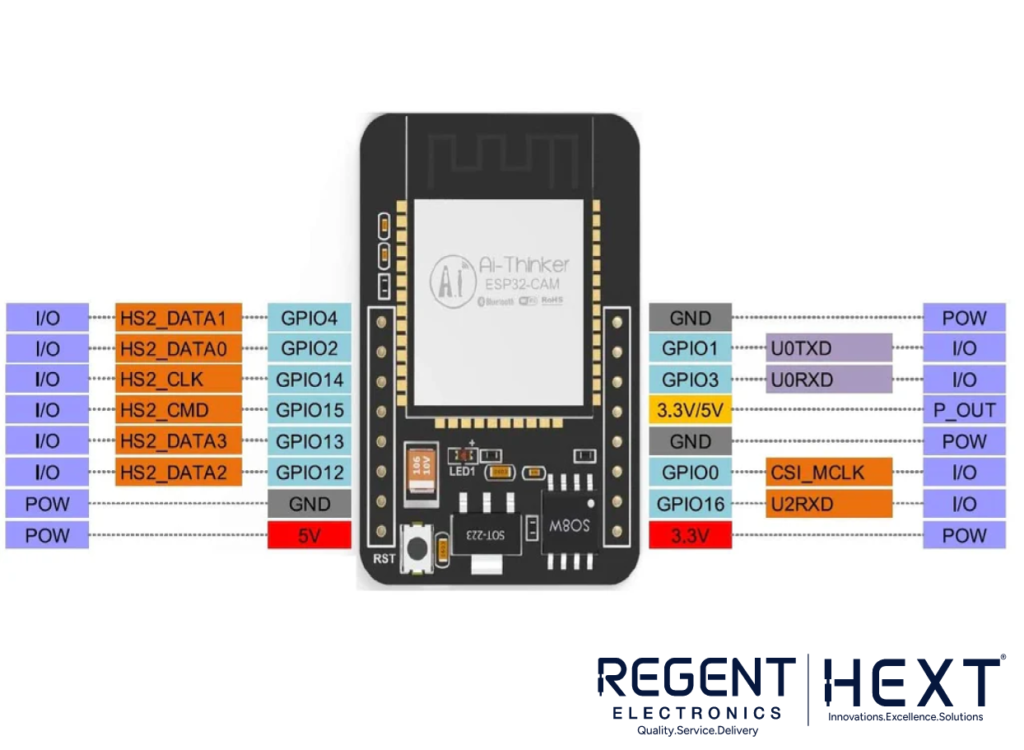
Before diving into the wiring and connections, let’s take a quick look at the ESP32-CAM pinout. The ESP32-CAM has several GPIO pins that can be used for connecting sensors, LEDs, or other peripherals. For this project, the PIR sensor will be connected to a GPIO pin on the ESP32-CAM.
Circuit Diagram and Connections
In this project, the ESP32-CAM will interact with a PIR Motion Sensor to detect any movement and trigger the camera to capture an image. The ESP32-CAM will store the captured image on a microSD card and use Deep Sleep mode for ultra-low power consumption.
Steps to connect ESP32-CAM and PIR Sensor:
- Connect the VCC of the PIR sensor to the 5V pin on the ESP32-CAM.
- Connect the GND of the PIR sensor to the GND of the ESP32-CAM.
- The OUT pin of the PIR sensor will be connected to GPIO 13 on the ESP32-CAM.
Working of the System
The ESP32-CAM operates in Deep Sleep mode, where it consumes very little power. The PIR sensor detects motion, and when it senses movement, it sends a high signal to GPIO 13 of the ESP32-CAM, which wakes it up from sleep. Upon waking up, the ESP32-CAM captures an image using the camera module and stores it on the microSD card.
After a brief delay, the ESP32-CAM returns to Deep Sleep mode, awaiting the next motion detection event.
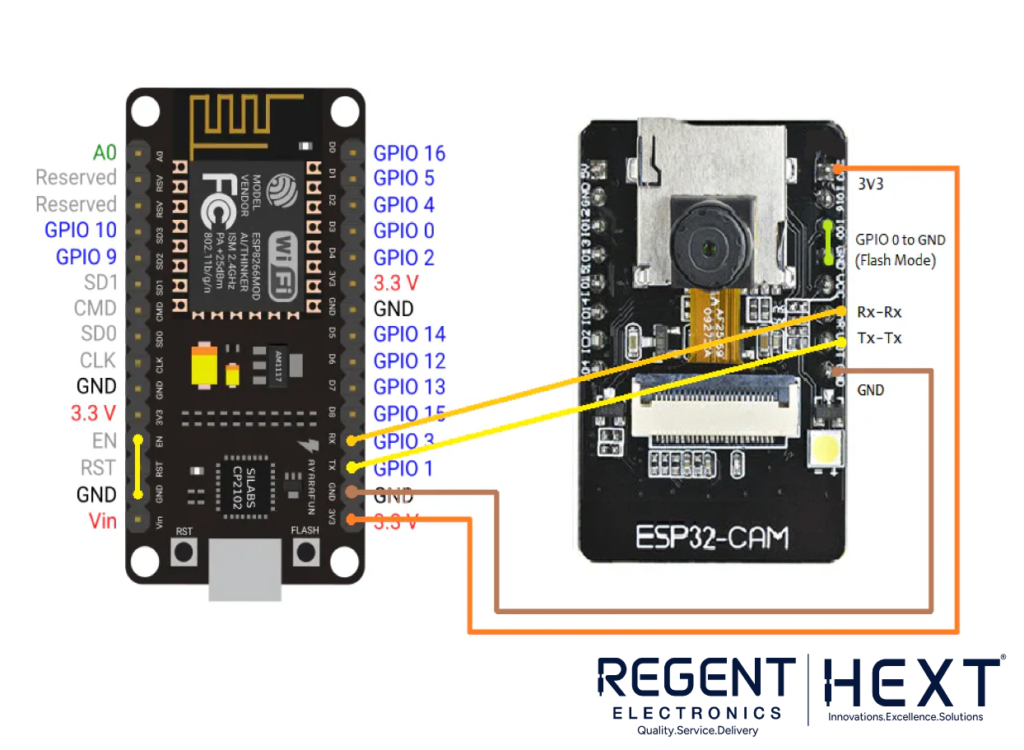
Programming the ESP32-CAM
In this tutorial, we will program the ESP32-CAM using a NodeMCU/Arduino board instead of the traditional FTDI programmer. This method simplifies the process and removes the need for an external USB-to-serial converter.
- First, connect the ESP32-CAM to your NodeMCU or Arduino board.
- Use the Arduino IDE to write and upload the code to the ESP32-CAM.
- The PIR sensor will trigger the camera to capture photos when motion is detected and store them on the microSD card.
Power Efficiency with Deep Sleep Mode
One of the key benefits of this project is the power efficiency. The Deep Sleep mode ensures that the ESP32-CAM only wakes up when necessary. By using the PIR sensor as an external wake-up signal, the system remains in a low-power state until motion is detected, making it perfect for long-term, battery-powered installations.
Conclusion
This ESP32-CAM Intruder Photo Capture and Alert System offers an affordable and reliable way to keep your home safe with minimal power consumption. With its ability to send alerts and capture images of intruders, combined with remote triggering from your smartphone, this IoT project is an ideal solution for modern home security.
By following this tutorial, you’ll not only learn how to set up the ESP32-CAM and PIR sensor but also gain a better understanding of integrating various IoT components to build a fully functioning, power-efficient system.
Ready to build your own security system? Let’s get started!