

Easy Guide to Building an HC-05 Bluetooth-Controlled Car
Introduction
Are you interested in building your own Bluetooth-controlled car using an Arduino? This guide will walk you through the step-by-step process of interfacing the HC-05 Bluetooth module with an Arduino to control a motor, allowing you to create your own wireless robotic vehicle.
What is the HC-05 Bluetooth Module?
The HC-05 is a versatile and affordable Bluetooth module that supports both master and slave modes, making it ideal for various wireless communication applications. It enables devices like Arduino to send and receive data wirelessly via serial communication (UART).
Components Required
Hardware:
- Arduino UNO
- HC-05 Bluetooth Module
- Motor Driver (L298N)
- DC Motors (2 or 4 depending on your design)
- Car Chassis
- Wheels
- Battery Pack (for power supply)
- Jumper Wires
Software:
- Arduino IDE
- Bluetooth Terminal App for Smartphones
Circuit Diagram & Connections
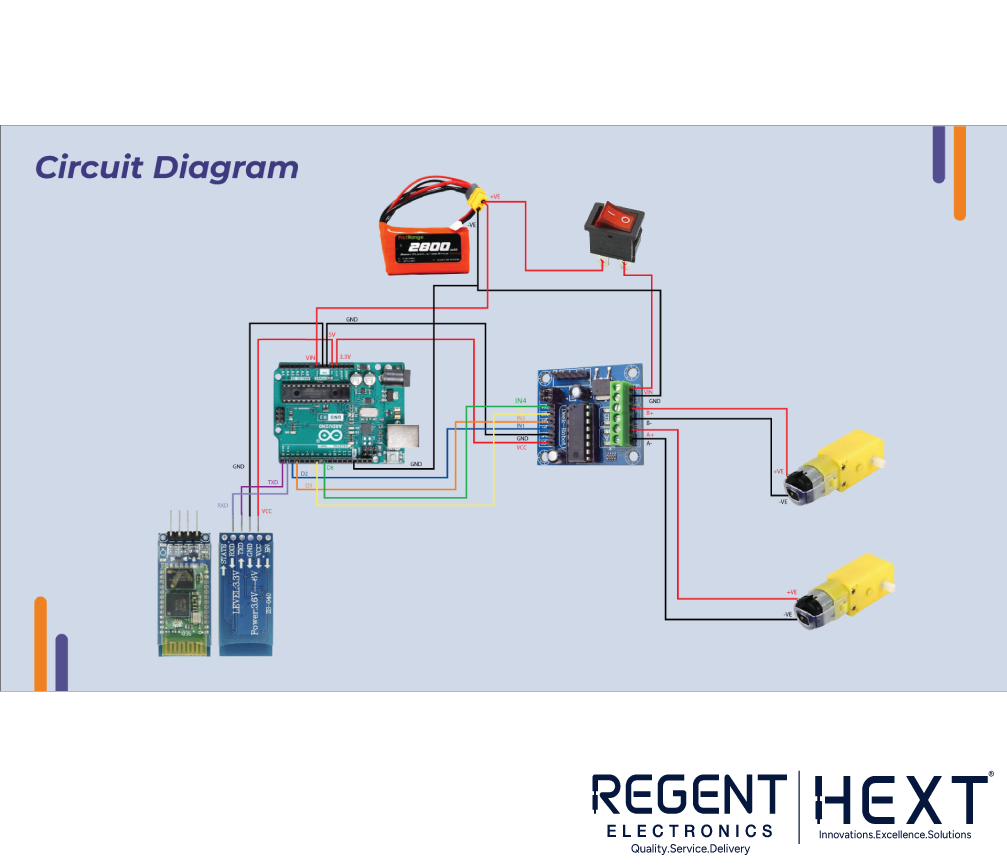
To ensure smooth operation, the HC-05 module and motor driver must be correctly connected to the Arduino.
Connecting HC-05 to Arduino:
- VCC → Arduino 5V
- GND → Arduino GND
- TX → Arduino RX (pin 0)
- RX → Arduino TX (pin 1)
Connecting Motor Driver to Arduino:
- IN1, IN2, IN3, IN4 → Arduino Digital Pins (2, 3, 7, 8)
- VCC → Battery Positive Terminal
- GND → Battery Negative Terminal & Arduino GND
- Motor Output Terminals → DC Motors
Bluetooth Pairing and App Setup
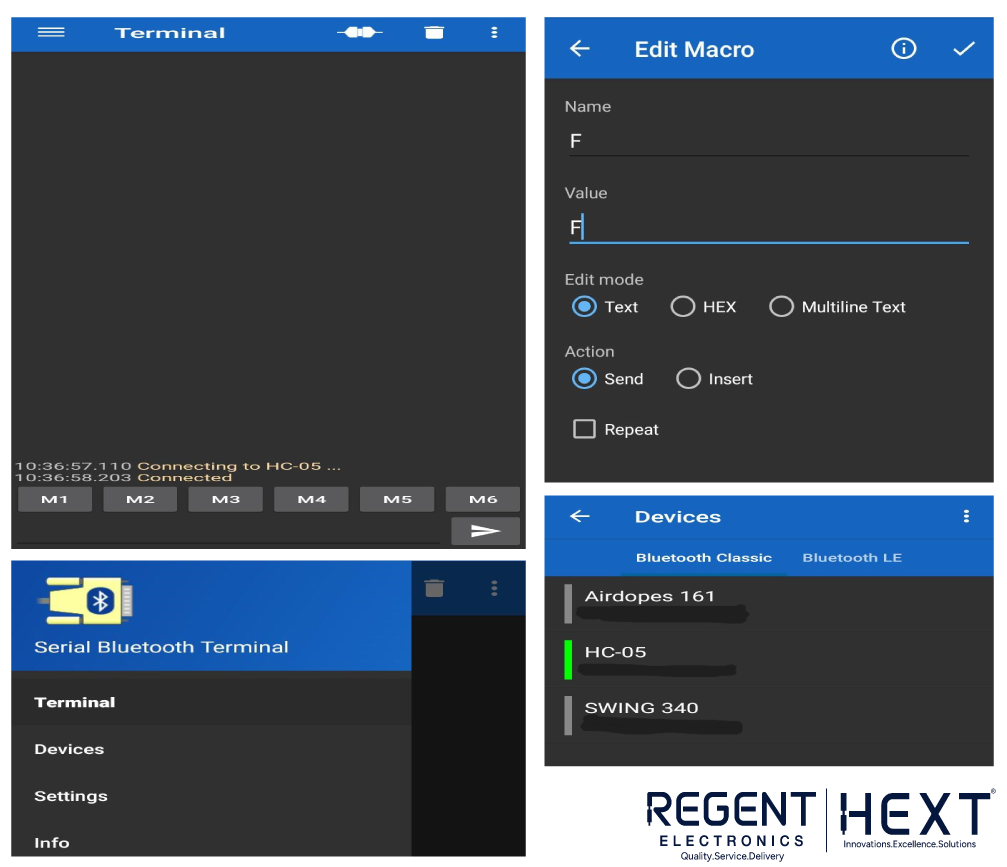
- Turn on the HC-05 module.
- Pair your smartphone with HC-05 (default password: 0000 or 1234).
- Install and open a Bluetooth terminal app.
- Connect the app to HC-05 and assign buttons for various movements.
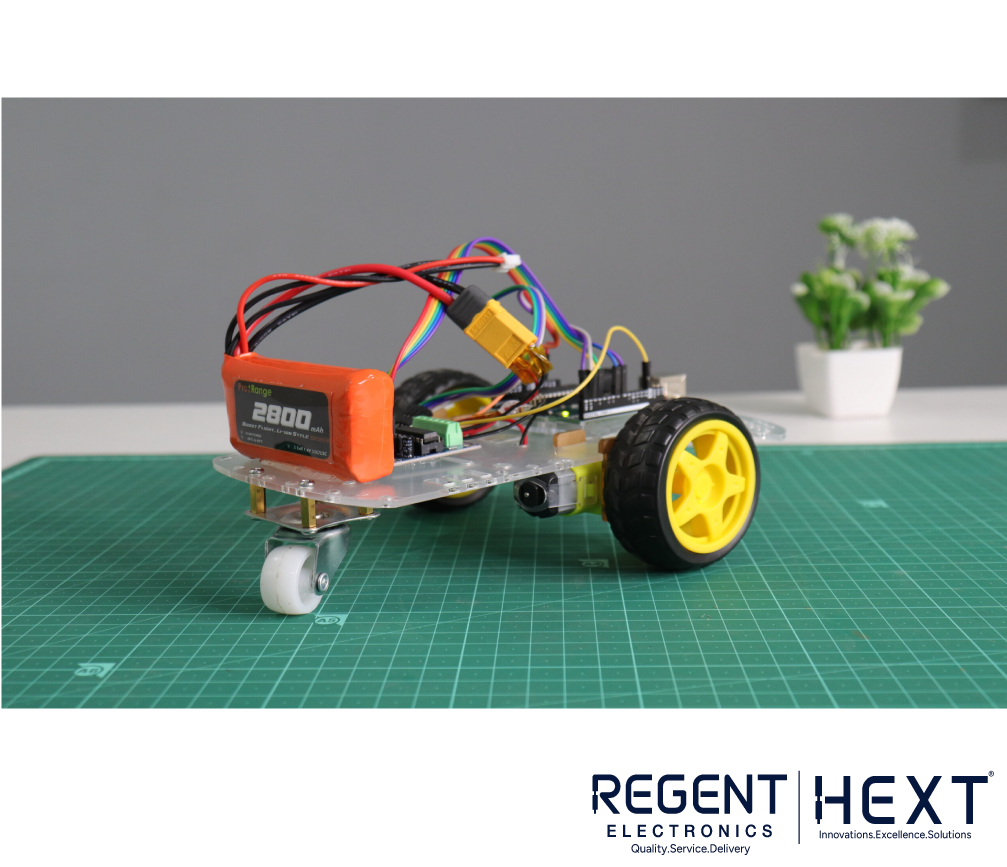
Assembly Steps
- Attach motors to the car chassis.
- Mount the Arduino and HC-05 module securely.
- Connect the motor driver to the Arduino following the circuit diagram.
- Ensure the power supply is correctly connected.
Arduino Code for Bluetooth-Controlled Car
// Define motor control pins
const int motor1Pin1 = 2;
const int motor1Pin2 = 3;
const int motor1En = 5;
const int motor2Pin1 = 7;
const int motor2Pin2 = 8;
const int motor2En = 6;
const int ledPin = 13;
int data;
int speedVal = 255; // Adjust speed between 0-255
void setup() {
pinMode(motor1Pin1, OUTPUT);
pinMode(motor1Pin2, OUTPUT);
pinMode(motor1En, OUTPUT);
pinMode(motor2Pin1, OUTPUT);
pinMode(motor2Pin2, OUTPUT);
pinMode(motor2En, OUTPUT);
pinMode(ledPin, OUTPUT);
Serial.begin(9600);
stopCar();
digitalWrite(ledPin, LOW);
}
void loop() {
while (Serial.available() > 0) {
data = Serial.read();
Serial.println(data);
if (data == ‘F’) forward();
else if (data == ‘B’) backward();
else if (data == ‘L’) left();
else if (data == ‘R’) right();
else if (data == ‘T’) stopCar();
if (data == ‘A’) digitalWrite(ledPin, HIGH);
else if (data == ‘B’) digitalWrite(ledPin, LOW);
}
}
void forward() {
digitalWrite(motor1Pin1, HIGH);
digitalWrite(motor1Pin2, LOW);
analogWrite(motor1En, speedVal);
digitalWrite(motor2Pin1, HIGH);
digitalWrite(motor2Pin2, LOW);
analogWrite(motor2En, speedVal);
}
void backward() {
digitalWrite(motor1Pin1, LOW);
digitalWrite(motor1Pin2, HIGH);
analogWrite(motor1En, speedVal);
digitalWrite(motor2Pin1, LOW);
digitalWrite(motor2Pin2, HIGH);
analogWrite(motor2En, speedVal);
}
void left() {
digitalWrite(motor1Pin1, LOW);
digitalWrite(motor1Pin2, HIGH);
analogWrite(motor1En, speedVal);
digitalWrite(motor2Pin1, HIGH);
digitalWrite(motor2Pin2, LOW);
analogWrite(motor2En, speedVal);
}
void right() {
digitalWrite(motor1Pin1, HIGH);
digitalWrite(motor1Pin2, LOW);
analogWrite(motor1En, speedVal);
digitalWrite(motor2Pin1, LOW);
digitalWrite(motor2Pin2, HIGH);
analogWrite(motor2En, speedVal);
}
void stopCar() {
digitalWrite(motor1Pin1, LOW);
digitalWrite(motor1Pin2, LOW);
analogWrite(motor1En, 0);
digitalWrite(motor2Pin1, LOW);
digitalWrite(motor2Pin2, LOW);
analogWrite(motor2En, 0);
}
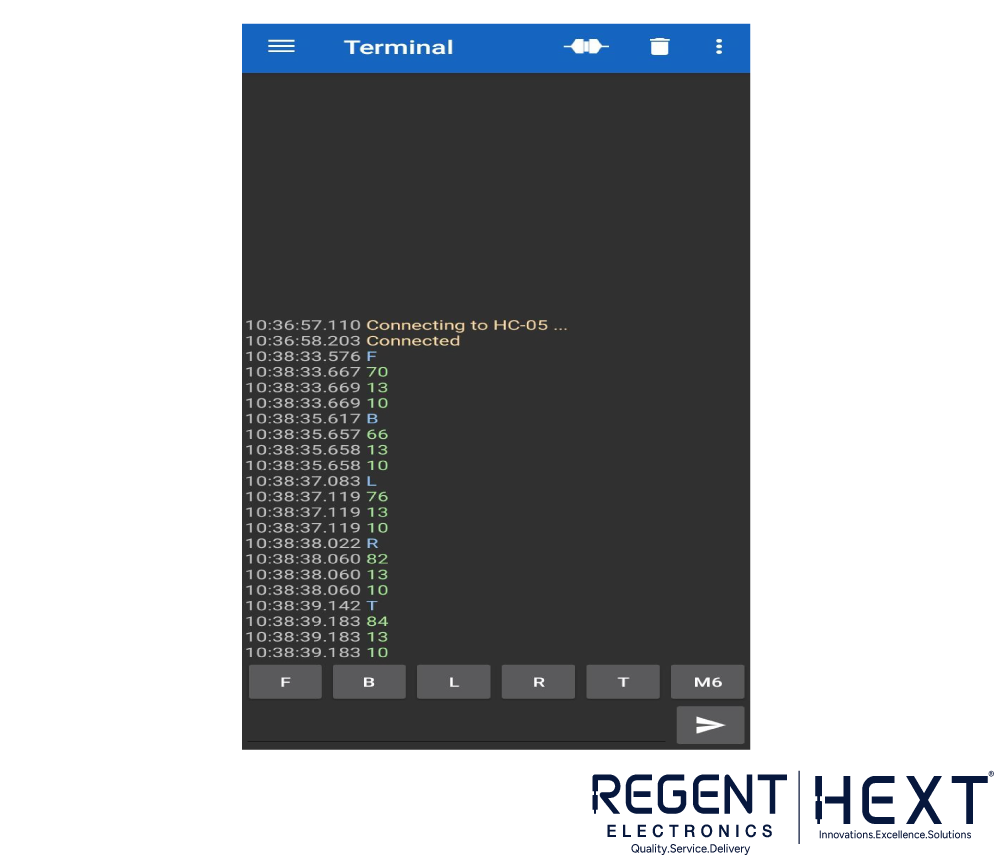
How It Works
- Power up the Arduino and motor driver.
- Connect your smartphone to the HC-05 Bluetooth module.
- Open the Bluetooth terminal app and connect to HC-05.
- Use the assigned button commands to control the car:
- F → Move Forward
- B → Move Backward
- L → Turn Left
- R → Turn Right
- T → Stop
Conclusion
Building a Bluetooth-controlled car using Arduino and HC-05 is a fantastic project to explore wireless communication and motor control. By following this guide, you can easily create your own remote-controlled car and expand its features as needed.
Let us know how your project goes in the comments! 🚗💨