

How to Control a Robot with Your Smartphone Using BLE | Regent Electronics
Have you ever wanted to build a robot that you can control with your smartphone? In this tutorial from Regent Electronics, we’ll guide you step-by-step on how to create a simple Bluetooth Low Energy (BLE) based robot using a microcontroller and the nRF52840 BLE Sense board. This beginner-friendly robotics project combines wireless communication, DC motors, and Arduino programming to get you started in mobile robot development.
🔧 What Is a Smartphone-Controlled Robot?
A smartphone-controlled robot is a mobile robot that can be operated wirelessly through commands sent from a mobile device. The robot is built using DC motors, motor drivers, a chassis, and a control board (microcontroller) with Bluetooth connectivity. In this project, we’ll use BLE (Bluetooth Low Energy) which is a power-efficient alternative to classic Bluetooth, making it ideal for embedded electronics projects.
🧰 Components Required
To build this BLE-based robot, gather the following components:
- Seeed Studio XIAO nRF52840 Sense
- L293D Motor Driver
- Robot Car Chassis with 2 DC Motors
- USB Type-C Cable
- Jumper Wires
- Battery Holder (4 Cells)
- AA Batteries – 4 Pieces
Once you’ve assembled all the parts and your chassis is ready, it’s time to connect the hardware.
🔌 Circuit Diagram and Working Principle
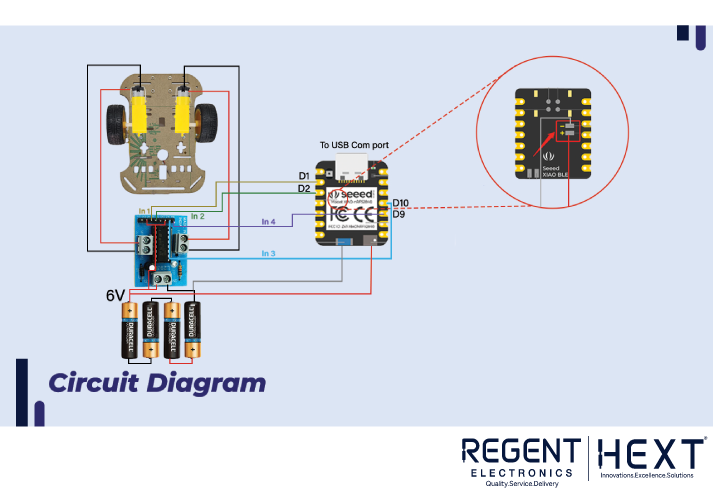
Understanding the L293D Motor Driver
The L293D is a dual H-Bridge motor driver that allows you to control the speed and direction of two DC motors. Here’s how it works:
- M1 & M2 control Motor A
- M3 & M4 control Motor B
- Inputs IN1/IN2 and IN3/IN4 determine motor direction
Example:
- IN1 = HIGH and IN2 = LOW → Right wheel moves forward
- Reverse the logic for backward motion
- Same for IN3/IN4 to control the left wheel
🛠 Setting Up the Board with Arduino IDE

Step 1: Add Board URL
Copy and paste this link into Arduino IDE preferences:
arduino
CopyEdit
- Go to File > Preferences
- Paste the URL into Additional Board Manager URLs
- Click OK
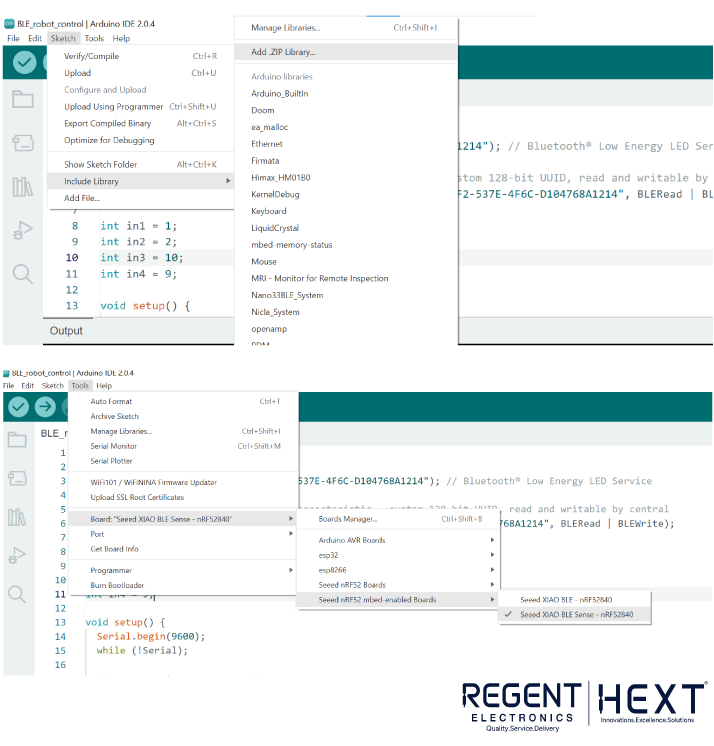
Step 2: Install the Board
- Navigate to Tools > Board > Board Manager
- Search for Seeed nrf52
- Install both libraries that appear
Step 3: Install ArduinoBLE Library
- Download the ArduinoBLE library ZIP file
- In the Arduino IDE: Sketch > Include Library > Add .ZIP Library
- Select the downloaded ZIP file to install
📥 Uploading the Code
Board and Port Selection:

- Tools > Board > Seeed nRF Mbed Enabled Boards > Seeed XIAO BLE Sense
- Select the correct COM port
BLE-Controlled Robot Code:
Paste the following code into Arduino IDE and upload it to your board:
cpp
CopyEdit
#include <ArduinoBLE.h>
BLEService ledService(“19B10000-E8F2-537E-4F6C-D104768A1214”);
BLEByteCharacteristic switchCharacteristic(“19B10001-E8F2-537E-4F6C-D104768A1214”, BLERead | BLEWrite);
int in1 = 1;
int in2 = 2;
int in3 = 10;
int in4 = 9;
void setup() {
Serial.begin(9600);
while (!Serial);
pinMode(LEDR, OUTPUT);
pinMode(LEDG, OUTPUT);
pinMode(LEDB, OUTPUT);
digitalWrite(LEDR, HIGH);
digitalWrite(LEDG, HIGH);
digitalWrite(LEDB, HIGH);
if (!BLE.begin()) {
Serial.println(“BLE initialization failed!”);
while (1);
}
BLE.setLocalName(“RegentBot”);
BLE.setAdvertisedService(ledService);
ledService.addCharacteristic(switchCharacteristic);
BLE.addService(ledService);
switchCharacteristic.writeValue(0);
BLE.advertise();
Serial.println(“BLE controlled robot ready.”);
}
void loop() {
BLEDevice central = BLE.central();
if (central) {
Serial.print(“Connected to: “);
Serial.println(central.address());
while (central.connected()) {
if (switchCharacteristic.written()) {
char command = switchCharacteristic.value();
Serial.println(command);
switch (command) {
case ‘f’: // Forward
driveMotors(HIGH, LOW, HIGH, LOW);
break;
case ‘b’: // Backward
driveMotors(LOW, HIGH, LOW, HIGH);
break;
case ‘l’: // Left
driveMotors(LOW, HIGH, HIGH, LOW);
break;
case ‘r’: // Right
driveMotors(HIGH, LOW, LOW, HIGH);
break;
case ‘s’: // Stop
driveMotors(LOW, LOW, LOW, LOW);
break;
}
}
}
Serial.print(“Disconnected from: “);
Serial.println(central.address());
}
}
void driveMotors(int m1a, int m1b, int m2a, int m2b) {
digitalWrite(in1, m1a);
digitalWrite(in2, m1b);
digitalWrite(in3, m2a);
digitalWrite(in4, m2b);
delay(1000);
}
📱 Controlling the Robot via Smartphone
- Download the “nRF Connect” app from the Google Play Store.
- Enable Bluetooth and launch the app.
- Scan and connect to the device named “RegentBot”.
- Under “Unknown Service”, use the write characteristic to send commands:
- ‘f’ for forward
- ‘b’ for backward
- ‘l’ for left
- ‘r’ for right
- ‘s’ for stop
Once connected and powered by your battery pack, your robot is ready for action!
✅ Conclusion
And there you have it — a complete guide to building a smartphone-controlled robot using BLE and the Seeed XIAO nRF52840 Sense. This project from Regent Electronics is a great introduction to wireless robotics and BLE technology.
If you have any questions or run into issues, feel free to leave a comment. Our support team is happy to help.