

Programming Raspberry Pi Pico Using MicroPython
Introduction Raspberry Pi Pico has gained immense popularity due to its affordability and ease of use with MicroPython. In this tutorial, we will guide you through the process of setting up Raspberry Pi Pico for MicroPython programming.
Overview of Raspberry Pi Pico Raspberry Pi Pico is a cost-effective microcontroller featuring the RP2040 chip, developed by the Raspberry Pi team. This board includes:
- A dual-core ARM Cortex-M0+ processor running at 133MHz
- 264KB RAM
- 26 GPIO pins (including three analog inputs)
- A micro-USB port
- An onboard temperature sensor
With its compact size, low power consumption, and powerful features, the Raspberry Pi Pico is an excellent choice for various embedded projects.
Installing MicroPython on Raspberry Pi Pico Setting up MicroPython on Pico is a straightforward process. Follow these steps:
- Visit the Raspberry Pi official website.
- Navigate to Products > Pico > Get Started > MicroPython section.
- Download the UF2 firmware file for MicroPython.
- Press and hold the BOOTSEL button on the Pico while connecting it to your PC via micro-USB.
- Your computer will detect the Pico as a mass storage device.
- Drag and drop the downloaded UF2 file onto the Pico’s storage.
- The Pico will reboot automatically and enter MicroPython mode.
After completing these steps, your Raspberry Pi Pico is ready for MicroPython programming.
Accessing MicroPython REPL (Read, Evaluate, Print, Loop) To start coding with MicroPython, follow these steps:

- Install Python: Download and install Python from the official website.
- Set up an IDE: Download Thonny IDE, a beginner-friendly Python IDE.
- Configure Thonny IDE:
- Open Thonny IDE.
- Go to Run > Select Interpreter.
- Select MicroPython (Raspberry Pi Pico) from the list.
- Choose the COM port where your Pico is connected.

To verify the installation, enter the following command in the Thonny IDE shell:
print(“Hello, Raspberry Pi Pico!”)
If the message prints successfully, your setup is complete.
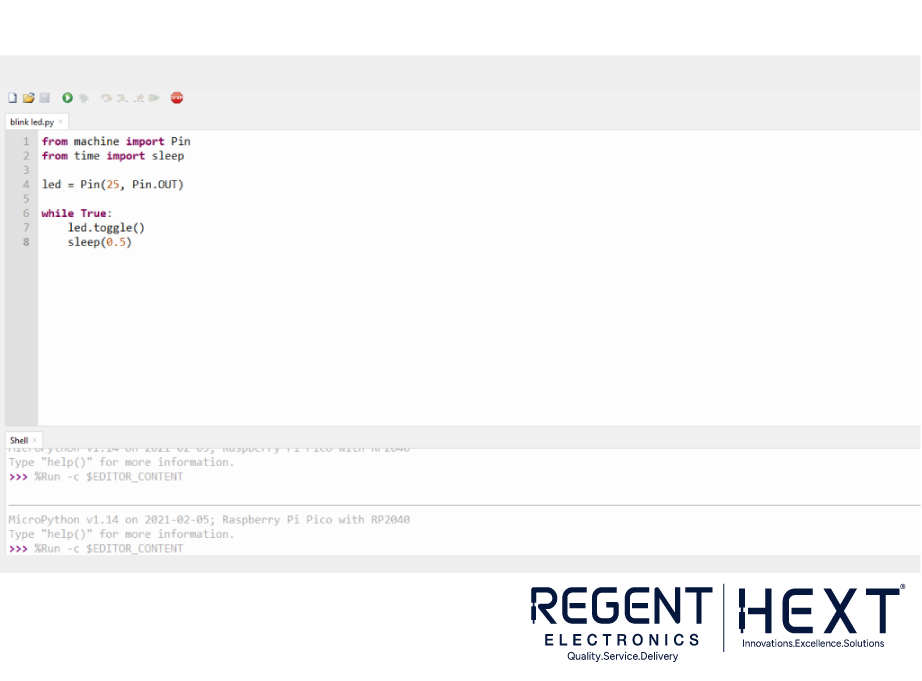
Programming Raspberry Pi Pico with MicroPython Once the setup is complete, you can start programming. The following example demonstrates how to blink the onboard LED on the Pico:
from machine import Pin
from time import sleep
led = Pin(25, Pin.OUT) # The onboard LED is connected to GPIO 25
while True:
led.toggle() # Change the LED state
sleep(0.5) # Delay for 500 milliseconds
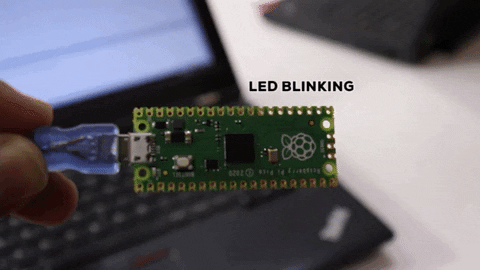
Save this script as a .py file and run it in Thonny IDE. The onboard LED will start blinking every 0.5 seconds.
Final Thoughts Programming the Raspberry Pi Pico with MicroPython is simple and efficient. With its affordability and rich feature set, the Pico is an excellent alternative to popular development boards. Whether you’re a beginner or an experienced developer, this microcontroller offers endless possibilities for innovation. Stay tuned for more tutorials on Raspberry Pi Pico and other development boards.
Happy coding!