
Getting Started with Arduino IoT Cloud: Connecting Nano ESP32 and Exchanging Data
Introduction to IoT and Arduino IoT Cloud
The Internet of Things (IoT) has revolutionized the way we interact with devices, enabling billions of physical devices to connect and communicate over the internet. With the number of connected devices growing rapidly, robust platforms like the Arduino IoT Cloud provide essential infrastructure for seamless data exchange and remote control.
What is Arduino IoT Cloud?
Arduino IoT Cloud is an intuitive platform designed to help users connect Arduino devices to the internet. It facilitates real-time data collection, remote monitoring, automation, and device control. With a user-friendly interface and seamless integrations, Arduino IoT Cloud is suitable for both beginners and advanced users.
How Does Arduino IoT Cloud Work?
The platform allows users to register and program their Arduino devices, create “Things” (digital representations of physical devices), define variables, and manage device communication. With features like Over-The-Air (OTA) updates, Alexa integration, and webhook support, Arduino IoT Cloud provides a comprehensive solution for IoT applications.
Features of Arduino IoT Cloud
- Data Monitoring: Easily track sensor values through a customizable dashboard.
- Variable Synchronization: Sync variables across multiple devices for real-time communication.
- Scheduler: Automate device operations by scheduling tasks.
- Over-The-Air (OTA) Uploads: Update device firmware remotely.
- Webhooks: Integrate with third-party services like IFTTT.
- Amazon Alexa Support: Enable voice control for IoT projects.
- Dashboard Sharing: Share live data with users across different locations.
Supported Devices for Arduino IoT Cloud
To use the Arduino IoT Cloud, you need a compatible board. Supported boards include:
Wi-Fi-Compatible Boards
- MKR 1000 Wi-Fi
- MKR Wi-Fi 1010
- Nano RP2040 Connect
- Nano 33 IoT
- GIGA R1 Wi-Fi
- Portenta H7 and Portenta H7 Lite Connected
- Portenta Machine Control
- Nicla Vision
- Opta
Other Connectivity Options
- LoRaWAN via The Things Stack
- GSM/NB-IoT boards like MKR GSM 1400 and MKR NB 1500
- Third-party ESP32 and ESP8266 boards
Setting Up Arduino IoT Cloud
Step 1: Create an Arduino Account
To get started, sign up for an Arduino account and navigate to the Arduino IoT Cloud platform.
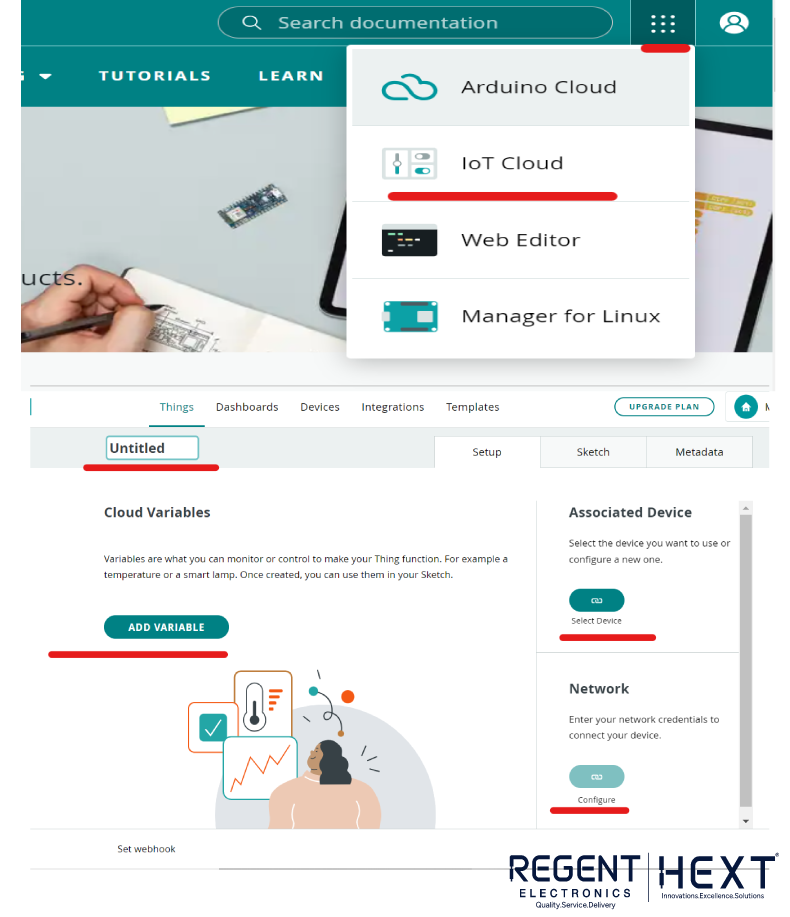

Step 2: Create a “Thing”
- Click on “Create Thing” to define your connected device.
- Assign a name for easy identification.
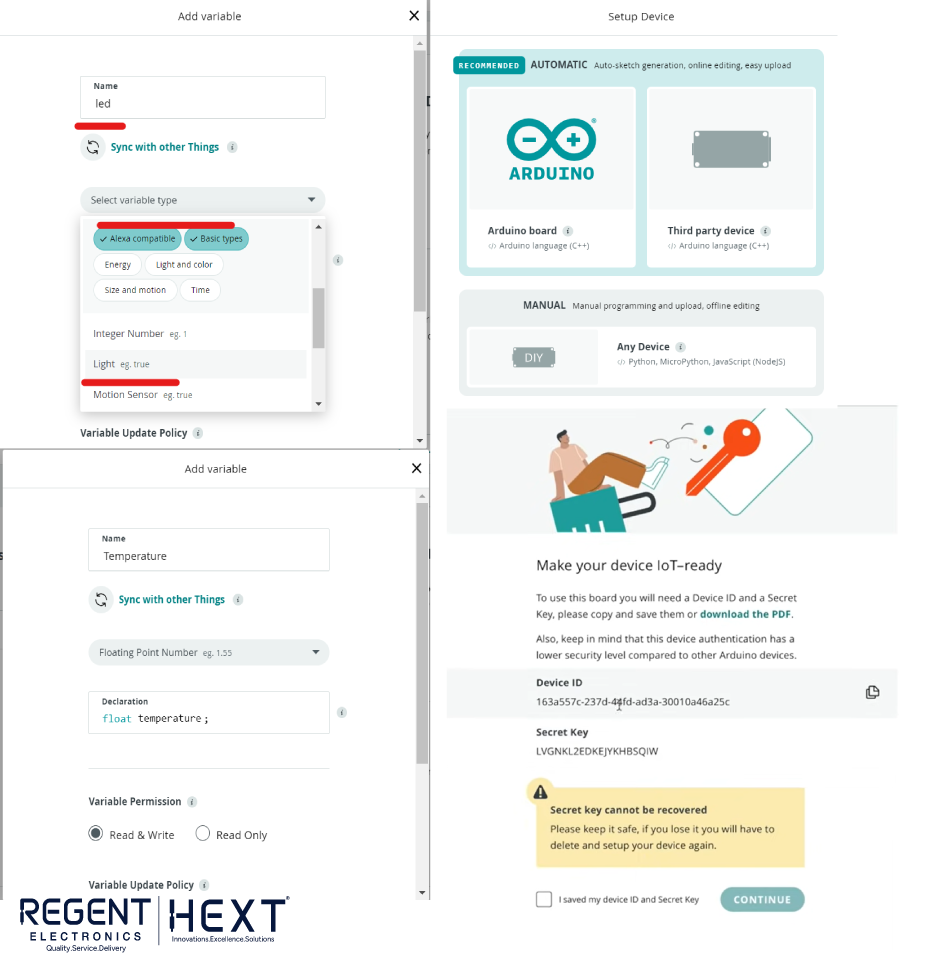
- Add variables (e.g., LED status, temperature, humidity).
- Set permissions (Read & Write) and update policies.
Step 3: Associate a Device
- Select your device type (Arduino Board or third-party board like ESP32/ESP8266).
- Install necessary drivers.
- Copy the Device ID and Secret Key for authentication.
Step 4: Configure Wi-Fi and Secret Key
Enter your Wi-Fi credentials and Secret Key to establish a secure connection.
Step 5: Write and Upload Code
Navigate to the “Sketch” tab to write and upload the code. The platform automatically generates callback functions for defined variables, enabling real-time cloud interactions.
Building a Dashboard for Remote Control
- Click on “Build Dashboard.”
- Add widgets such as switches, gauges, or percentage meters.
- Link widgets to corresponding variables (e.g., switch for LED control).
- Once configured, control devices via a web browser or mobile app.

Sample Arduino IoT Cloud Code
#include “thingProperties.h”
#include “DHT.h”
#define DHTPIN 5
#define DHTTYPE DHT22
DHT dht(DHTPIN, DHTTYPE);
int interval = 2000;
unsigned long previousMillis = 0;
void setup() {
Serial.begin(9600);
delay(1500);
dht.begin();
initProperties();
ArduinoCloud.begin(ArduinoIoTPreferredConnection);
pinMode(13, OUTPUT);
setDebugMessageLevel(2);
ArduinoCloud.printDebugInfo();
}
void loop() {
ArduinoCloud.update();
unsigned long currentMillis = millis();
if ((currentMillis – previousMillis) >= interval) {
humidity = dht.readHumidity();
temperature = dht.readTemperature();
previousMillis = currentMillis;
}
}
void onLedChange() {
(led == 1) ? digitalWrite(13, HIGH) : digitalWrite(13, LOW);
}
void onTemperatureChange() {
// Action on temperature change
}
void onHumidityChange() {
// Action on humidity change
}
Conclusion
With Arduino IoT Cloud, you can easily build and deploy IoT applications using the Nano ESP32 and other supported devices. The platform offers a seamless experience, allowing users to remotely monitor, control, and automate devices through an intuitive interface. Whether you’re an IoT beginner or an expert, Arduino IoT Cloud provides powerful tools to bring your projects to life. Start experimenting today and unlock the full potential of IoT!