
Designing a GPIO Control Panel Using Tkinter for Raspberry Pi
Introduction
In this tutorial, we will guide you through the process of designing a graphical user interface (GUI) panel to control all 21 GPIO pins of a Raspberry Pi. This interface, developed using Tkinter in Python, will allow you to set each GPIO pin as an input or output.
What is a GUI?
A graphical user interface (GUI) is a visual way of interacting with a system using elements like windows, buttons, and text fields instead of command-line instructions. By integrating Tkinter, a built-in Python module, we can create an efficient and interactive GUI for controlling Raspberry Pi’s GPIO pins.
Step 1 – Setting Up the Raspberry Pi
To begin, open the Python IDLE on your Raspberry Pi and create a new Python file. Copy and paste the following code into the file.
import sys
import RPi.GPIO as pi
import math
if sys.version_info[0] < 3:
from Tkinter import *
else:
from tkinter import *
class LED(Frame):
OFF_STATE = 0
ON_STATE = 1
def __init__(self, master, size=10, **kw):
self.size = size
Frame.__init__(self, master, width=size, height=size)
self.configure(**kw)
self.state = LED.OFF_STATE
self.c = Canvas(self, width=self[‘width’], height=self[‘height’])
self.c.grid()
self.led = self._drawcircle((self.size/2) + 1, (self.size/2) + 1, (self.size – 1) / 2)
def _drawcircle(self, x, y, rad):
color = “red”
return self.c.create_oval(x – rad, y – rad, x + rad, y + rad, width=rad/5, fill=color, outline=’black’)
def _change_color(self):
color = “green” if self.state == LED.ON_STATE else “red”
self.c.itemconfig(self.led, fill=color)
def set(self, state):
self.state = state
self._change_color()
def get(self):
return self.state
class GPIO(Frame):
gpio_modes = (“Passive”, “Input”, “Output”)
def __init__(self, parent, pin=0, name=None, **kw):
self.pin = pin
self.name = name if name else f”GPIO {self.pin:02d}”
Frame.__init__(self, parent, width=150, height=20, relief=SUNKEN, bd=1, padx=5, pady=5)
self.parent = parent
self.configure(**kw)
self.state = False
self.cmdState = IntVar()
self.Label = Label(self, text=self.name)
self.mode_sel = Spinbox(self, values=self.gpio_modes, wrap=True, command=self.setMode)
self.set_state = Checkbutton(self, text=”High/Low”, variable=self.cmdState, command=self.toggleCmdState)
self.led = LED(self, 20)
self.Label.grid(column=0, row=0)
self.mode_sel.grid(column=1, row=0)
self.set_state.grid(column=2, row=0)
self.led.grid(column=3, row=0)
self.set_state.config(state=DISABLED)
def isInput(self):
return self.mode_sel.get() == “Input”
def setMode(self):
mode = self.mode_sel.get()
if mode == “Input”:
self.set_state.config(state=DISABLED)
pi.setup(self.pin, pi.IN)
elif mode == “Passive”:
self.set_state.config(state=DISABLED)
pi.cleanup(self.pin)
else:
self.set_state.config(state=NORMAL)
pi.setup(self.pin, pi.OUT)
self.updateInput()
def toggleCmdState(self):
self.state = self.cmdState.get()
self.updateLED()
self.updatePin()
def updatePin(self):
pi.output(self.pin, self.state)
def updateLED(self):
self.led.set(self.state)
def updateInput(self):
if self.isInput():
self.state = pi.input(self.pin)
self.updateLED()
class App(Frame):
def __init__(self, parent=None, **kw):
Frame.__init__(self, parent, **kw)
self.parent = parent
pi.setmode(pi.BCM)
self.ports = []
gpio_pins = [2, 3, 4, 17, 27, 22, 10, 9, 11, 5, 6, 13, 19, 26, 14, 15, 18, 23, 24, 25, 8, 7]
for num, pin in enumerate(gpio_pins):
self.ports.append(GPIO(self, pin=pin))
self.ports[-1].grid(row=num // 5, column=num % 5)
self.update()
def onClose(self):
try:
pi.cleanup()
except RuntimeWarning as e:
print(e)
self.destroy()
self.parent.destroy()
def readStates(self):
for port in self.ports:
port.updateInput()
def update(self):
self.readStates()
self._timer = self.after(100, self.update)
def main():
root = Tk()
root.title(“Raspberry Pi GPIO”)
app = App(root)
app.grid()
root.protocol(“WM_DELETE_WINDOW”, app.onClose)
root.resizable(False, False)
root.mainloop()
if __name__ == ‘__main__’:
main()
Step 2 – Running the Program
- Save the program as gpio.py.
- Open the terminal and run the command:
- sudo python gpio.py
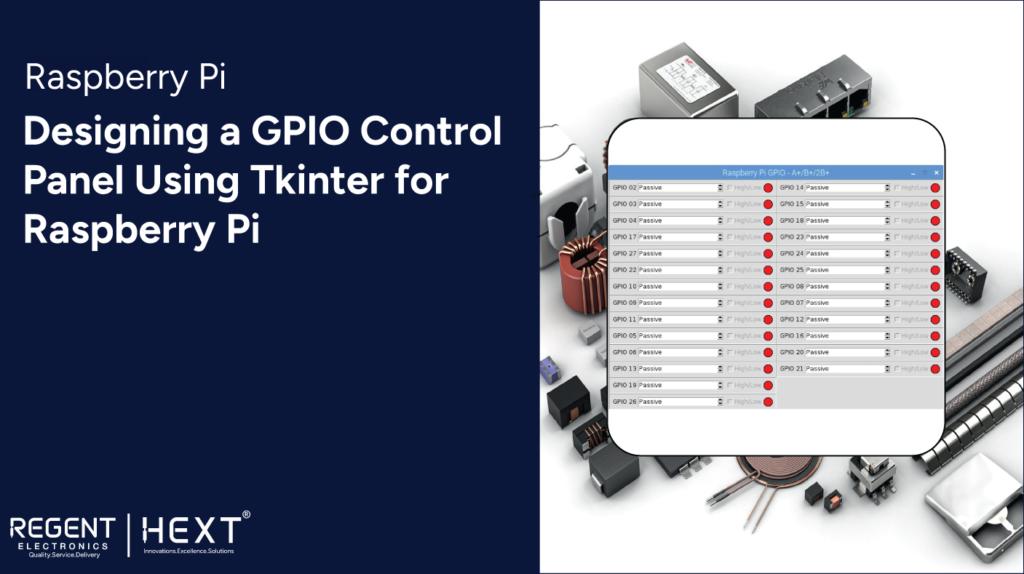
- A GUI panel will open, allowing you to control the GPIO pins interactively.
Understanding the GUI Panel
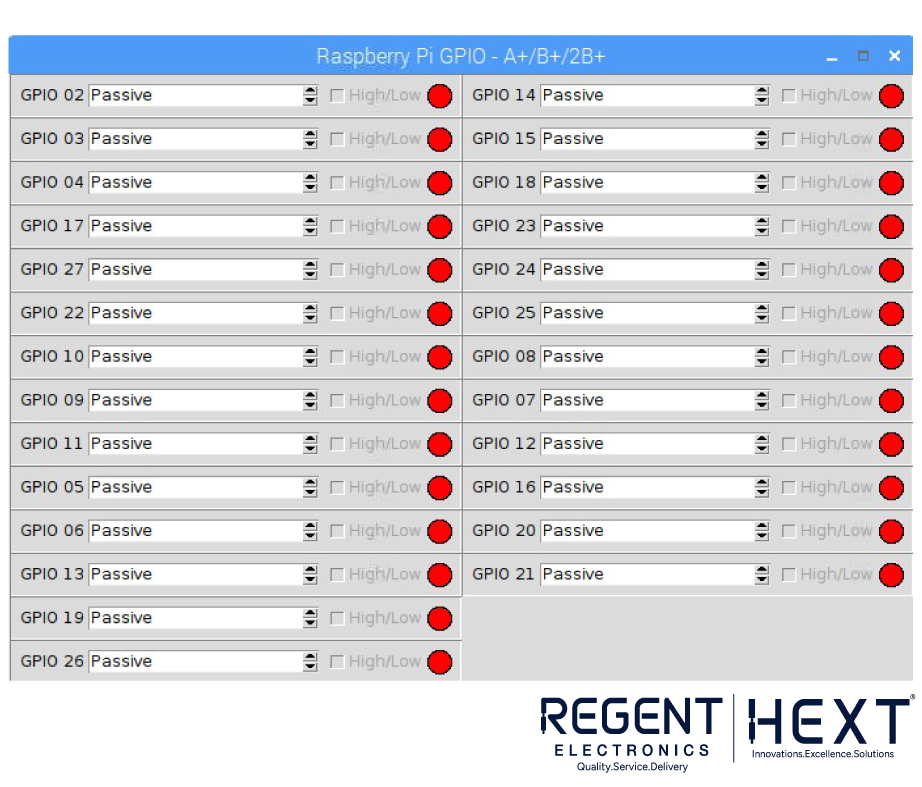
- Set each GPIO pin as Passive, Input, or Output using the dropdown menu.
- If set as Output, toggle the High/Low checkbox to change the pin state.
- If set as Input, the LED will turn red for low and green for high.
Conclusion
With this Tkinter-based GUI, you can easily control Raspberry Pi’s GPIO pins. Experiment with different configurations and explore the full potential of Python GUI programming. For more details on Tkinter, visit Python’s official documentation.