
How to Enable I2C on Raspberry Pi Zero 2W and Use an OLED Display (SSD1306)
In this hands-on tutorial, the team at Regent Electronics walks you through enabling I2C on Raspberry Pi Zero 2W and displaying output on an SSD1306 OLED screen. This project is perfect for beginners exploring Raspberry Pi’s GPIO capabilities and developers building compact, display-based embedded solutions.
🧠 What You’ll Learn
- How to enable I2C on Raspberry Pi Zero 2W
- How to connect and interface a 0.96″ SSD1306 OLED display
- How to display basic text using Python and the luma.oled library
Let’s get started!
🧾 Table of Contents
- What is Raspberry Pi?
- About Raspberry Pi Zero 2W
- Required Hardware & Software
- Circuit Diagram and OLED Wiring
- Enable I2C on Raspberry Pi
- Set Up Python Virtual Environment
- Install Required Libraries
- Test & Display Text on OLED
- Conclusion
📌 What is Raspberry Pi?
The Raspberry Pi is a compact, budget-friendly single-board computer developed to promote computer science education and DIY electronics. It supports operating systems like Raspberry Pi OS and programming languages such as Python, C++, and Java.
Its GPIO pins make it a go-to choice for projects in home automation, robotics, and IoT development.
🧩 About Raspberry Pi Zero 2W
The Raspberry Pi Zero 2W is an enhanced version of the Pi Zero lineup, ideal for small-scale, power-efficient projects.
🔧 Key Features:
- Quad-core 64-bit ARM Cortex-A53 CPU
- 512MB LPDDR2 RAM
- Integrated Wi-Fi (802.11 b/g/n) and Bluetooth 4.2
- Mini HDMI, USB OTG, and CSI camera interface
- GPIO compatibility for sensors and displays
✅ Required Hardware & Software
🛠️ Hardware:
- Raspberry Pi Zero 2W
- SSD1306 OLED Display (0.96″, I2C Interface)
- 32GB MicroSD Card
- Pi Zero 2W Case & Heat Sinks
- Jumper wires and Micro USB cables
💻 Software:
- Raspberry Pi OS
- Python3 with pip
- luma.oled Python library
- Git (for downloading example code)
📊 Circuit Diagram and OLED Wiring

🔌 OLED Display (SSD1306) to Raspberry Pi GPIO:
| OLED Pin | Raspberry Pi Pin |
| VCC | 3.3V (Pin 1) |
| GND | GND (Pin 6) |
| SDA | GPIO2 (Pin 3) |
| SCL | GPIO3 (Pin 5) |
Make sure the OLED module is I2C-compatible and supports 3.3V logic.
⚙️ Enable I2C on Raspberry Pi
- Open the configuration menu:
bash
CopyEdit
sudo raspi-config
- Go to Interface Options > I2C and enable it.
- (Optional) Boost I2C speed for smoother performance:
bash
CopyEdit
sudo nano /boot/firmware/config.txt
Find the line with dtparam=i2c_arm=on and change it to:
ini
CopyEdit
dtparam=i2c_arm=on,i2c_arm_baudrate=400000
Save and exit (CTRL+S, then CTRL+X).
- Verify I2C is active:
bash
CopyEdit
ls -l /dev/i2c*
You should see something like /dev/i2c-1.
🧱 Set Up Python Virtual Environment
Using a virtual environment isolates project dependencies from system-wide Python installations.
bash
CopyEdit
mkdir oled_display
cd oled_display
python3 -m venv venv
source venv/bin/activate
📦 Install Required Libraries
Install essential Python and I2C packages:
bash
CopyEdit
sudo apt update
sudo apt install -y python3-dev python3-smbus i2c-tools python3-pil python3-setuptools python3-venv
Install the luma.oled display driver:
bash
CopyEdit
pip install –upgrade luma.oled
Install Git and clone display examples:
bash
CopyEdit
sudo apt install git -y
git clone https://github.com/rm-hull/luma.examples.git
Install dependencies for running sample scripts:
bash
CopyEdit
sudo apt install -y python3-pil libjpeg-dev zlib1g-dev python3-av
sudo apt install -y libfreetype6-dev liblcms2-dev libopenjp2-7
🧪 Test & Display Text on OLED
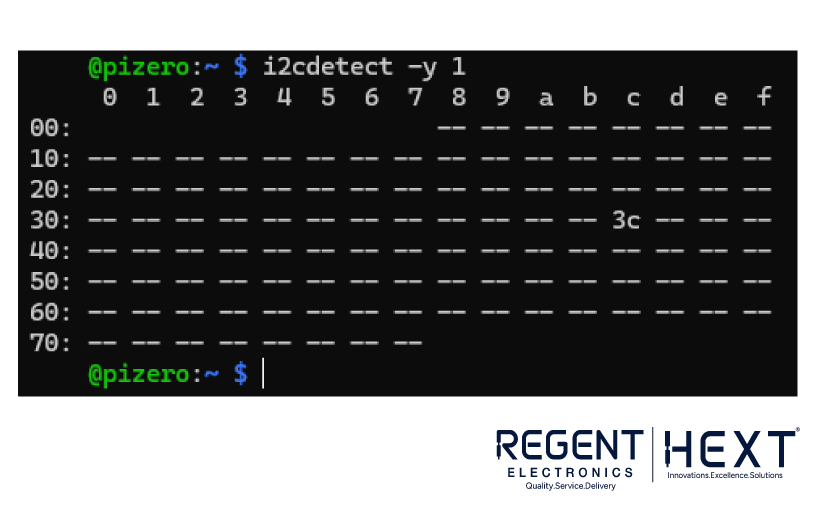
Detect the display:
bash
CopyEdit
i2cdetect -y 1
You should see the address 0x3C if the display is connected properly. If it shows 0x3D, the OLED’s jumper is likely configured for that address.
Create a new Python script:
bash
CopyEdit
nano disp.py
Paste the following code:
python
CopyEdit
from luma.core.interface.serial import i2c
from luma.core.render import canvas
from luma.oled.device import ssd1306
from PIL import ImageFont
import time
def main():
serial = i2c(port=1, address=0x3C)
device = ssd1306(serial)
try:
font = ImageFont.truetype(“arial.ttf”, 16)
except IOError:
font = ImageFont.load_default()
while True:
with canvas(device) as draw:
draw.text((10, 10), “Hello World”, font=font, fill=255)
time.sleep(1)
if __name__ == “__main__”:
main()
Save and exit (CTRL+S, CTRL+X), then run:
bash
CopyEdit
python disp.py
You should see “Hello World” displayed on your OLED screen!
🧹 Cleanup (Optional)
If the virtual environment gets corrupted or you want a fresh start:
bash
CopyEdit
rm -rf ~/oled_display/venv
🧾 Conclusion
You’ve now learned how to:
- Enable I2C on Raspberry Pi Zero 2W
- Connect and verify an SSD1306 OLED display
- Display text using Python and the luma.oled library
This simple setup is a solid foundation for more complex projects involving sensors, UI menus, or real-time data monitoring.